The above is an advertisment. If it asks you to download software or create an account, please ignore it.
Site News -
8/4: More AI Bot News |
7/31: How to Fix Site Errors 403 |
5/10: Members: Log In to See Fewer Ads!
Installing SAAB Audio
 This section is
provided as a record of my experiences installing the various
bits and pieces in my two Saabs. You need to take care not to
damage the existing electrical system, new components, or those
little plastic clips that hold all the trim panels together !!
Disconnect the battery when wiring in new components, the battery
can deliver very large currents (80 amps !!) so be careful not
to short it out and fit fuses to all appropriate components.
This section is
provided as a record of my experiences installing the various
bits and pieces in my two Saabs. You need to take care not to
damage the existing electrical system, new components, or those
little plastic clips that hold all the trim panels together !!
Disconnect the battery when wiring in new components, the battery
can deliver very large currents (80 amps !!) so be careful not
to short it out and fit fuses to all appropriate components.
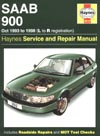
If you want more detailed information, then I recomment the
Haynes
service manual, it covers the 900 with full circuit diagram.
If you have a 9-3 then the manual is stiff useful for all the
mechanicals and trim, but the electrical wiring is different.
The pin out of the head unit and other components may change over
time and you should check them first before connecting. If you
don't have the equipment to do this, then you should get help
from someone who does.
Saab Audio System head unit
| Front speakers | Rear speakers
| Amplifier
CD Multi-Player (Optional) | Cables
| Removing the glovebox | Mobile
Phone
Saab 900/9-3 Audio System head unit
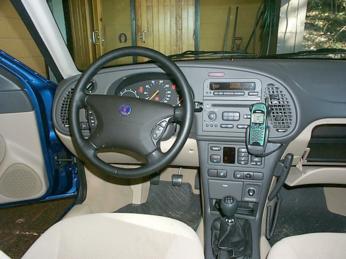 You can easily remove
the head unit with two special metal handles that fit into the
holes on either side of the unit, move the wiper/indicator stalk
up and pull the unit out. There are three sockets already used
and a spare din socket for the amplifier (pre-out). The main sockets
are two multi way block connectors that follow the ISO standard,
the brown one carries signals to the front/rear speakers. The
other carries power/data to the display and controls the electric
aerial. There is also a socket for the radio aerial.
You can easily remove
the head unit with two special metal handles that fit into the
holes on either side of the unit, move the wiper/indicator stalk
up and pull the unit out. There are three sockets already used
and a spare din socket for the amplifier (pre-out). The main sockets
are two multi way block connectors that follow the ISO standard,
the brown one carries signals to the front/rear speakers. The
other carries power/data to the display and controls the electric
aerial. There is also a socket for the radio aerial.
If you run any cables to the head unit, you will certainly
need to remove the globebox and passenger side trim.
 Pre-out: On the top right SIDE of the
unit is an 8 pin din that carries pre-out and a sense signal to
turn the amplifier on. The pin out is shown on the left. I could
not find a source for this cable either from Saab or Clarion and
had to make up my own. For 900 it must also be a right angle din
plug and have the cable exiting in the direction marked (otherwise
the cable or plug will stop the head unit fitting back into the
dashboard). I could not even find a right angle 8pin din plug
so I had to make one up from two right angle FIVE pin din plugs
!! Also the cable exited in the wrong direction so I had to fix
that too !! It was worth it, since otherwise the installers would
have used the speaker level outputs from the head unit which would
have affected sound quality a lot. The pre-out carries a sense
pin to switch on the amplifier but this did not have enough current
to turn on both the amplifiers I have in my 9-3, so I used the
electric aerial/antenna output instead, just tap into that and
feed it into the remote-on connection of the amplifier.
Pre-out: On the top right SIDE of the
unit is an 8 pin din that carries pre-out and a sense signal to
turn the amplifier on. The pin out is shown on the left. I could
not find a source for this cable either from Saab or Clarion and
had to make up my own. For 900 it must also be a right angle din
plug and have the cable exiting in the direction marked (otherwise
the cable or plug will stop the head unit fitting back into the
dashboard). I could not even find a right angle 8pin din plug
so I had to make one up from two right angle FIVE pin din plugs
!! Also the cable exited in the wrong direction so I had to fix
that too !! It was worth it, since otherwise the installers would
have used the speaker level outputs from the head unit which would
have affected sound quality a lot. The pre-out carries a sense
pin to switch on the amplifier but this did not have enough current
to turn on both the amplifiers I have in my 9-3, so I used the
electric aerial/antenna output instead, just tap into that and
feed it into the remote-on connection of the amplifier.
Pin out is the same for both 900 and 9-3, but on the 9-3
the plug does NOT have to be right angled.
If you don't want to make your own cable, then Saab do sell
the connector and cable seperately part #4232807 Booster Cable
HA. The cost is $75. (that's seventy five !! now you can see why
I made my own ).
Here is the pin out for the rest of the 900 head unit, thanks
to Philip Kerr for this. The 9-3 does not have the seperate
din plug for the CD Changer, it uses the ISO connectors.
Front Speakers
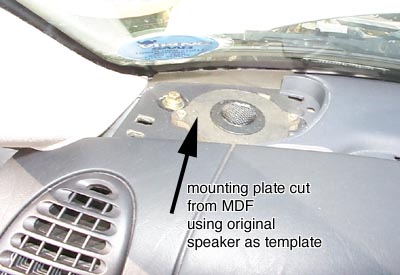 The speakers on the
dashboard are easy to access and remove. There is a small notch
in the plastic grille, lever this up with a screwdriver and the
grill will easily pop out. You can either fit 8.5cm two way speakers
in here, or flush mount the tweeters for component speakers. Most
component tweeters will come with a adapters for flush mounting.
The speakers on the
dashboard are easy to access and remove. There is a small notch
in the plastic grille, lever this up with a screwdriver and the
grill will easily pop out. You can either fit 8.5cm two way speakers
in here, or flush mount the tweeters for component speakers. Most
component tweeters will come with a adapters for flush mounting.
As with all the speakers, don't forget to save the old ones
so you can put them back when you sell the car.
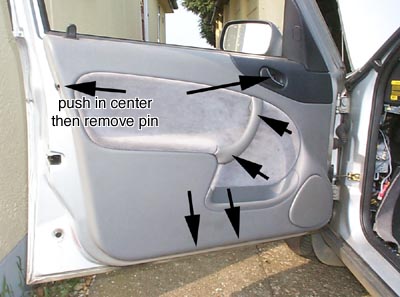 The door speakers are harder to
access since you will have to remove the entire door panel. Do
not try to lever off the speaker grille since this is fixed from
behind. See the diagram left for the location of the door mounting
screws, there is also a plastic clip above the lock which I broke
on both doors and had to replace on with a screw that was very
tricky. The trick to these it to depress the centre by about 2mm,
the clip can then be pulled out. If you do break them, the Saab
dealer has spares for about $2 (in a variety of colors). Once
you've removed these, the panel pushes off over the door lock
button. Then you'll see the cutouts for the front speakers, you
will probably have to drill holes for the mounting screws since
the existing ones might not match. Make sure the speakers do not
foul the windows when they are down, if they do then you might
need spacing rings (which some speakers come with).
The door speakers are harder to
access since you will have to remove the entire door panel. Do
not try to lever off the speaker grille since this is fixed from
behind. See the diagram left for the location of the door mounting
screws, there is also a plastic clip above the lock which I broke
on both doors and had to replace on with a screw that was very
tricky. The trick to these it to depress the centre by about 2mm,
the clip can then be pulled out. If you do break them, the Saab
dealer has spares for about $2 (in a variety of colors). Once
you've removed these, the panel pushes off over the door lock
button. Then you'll see the cutouts for the front speakers, you
will probably have to drill holes for the mounting screws since
the existing ones might not match. Make sure the speakers do not
foul the windows when they are down, if they do then you might
need spacing rings (which some speakers come with).
 You will have to check
you car to see if it is wired for door speakers already, my 900
wasn't, but my 9-3 was. If not then you will have to run your
own cable through the door connector.
You will have to check
you car to see if it is wired for door speakers already, my 900
wasn't, but my 9-3 was. If not then you will have to run your
own cable through the door connector.
If you car is wired, then I recommend you use that cable to get
from the door speaker to behind the heater controls and then your
own cable from there to your amplifier (wherever that is). The
AS3 connectors are shown in the diagram to the left.
If you are using component front speakers, then some kind of crossovers
will probably come with the speakers. These should be sited near
to the front speakers (rather than near the amp) and depending
on their size you should be able to fit them behind the dashboard
or kick panels. Removing the glove box and panel below the steering
wheel is very easy (see below) and they can be fixed behind the
dash somewhere. Some crossovers can be quite big (20cm x 10cm)
so you might want to check that you can find room for these before
buying speaker with such a big crossover. Most will let you choose
hi/lo settings for the tweeter which you can adjust for taste
(do this before putting the car back together or you'll have to
remove the panels again to change it !).
Rear speakers
Compared to the front door speakers, the rear speakers are
a snap to change and being quite big (6x9 inch) can deliver quite
reasonable bass.
 The speaker grilles snap off: Push
on the two catches under the edge facing the front of the car,
then lever off the grilles and pull them towards the front
of the car to remove them. The speakers can be then be removed
and replaced. Do not force them upwards as the clips are quite
easy to break.
The speaker grilles snap off: Push
on the two catches under the edge facing the front of the car,
then lever off the grilles and pull them towards the front
of the car to remove them. The speakers can be then be removed
and replaced. Do not force them upwards as the clips are quite
easy to break.
Althought the Saab speakers are standard 6x9 design, some other
speakers are too deep for the hole and you might need to enlarge
the mounting hole (this was true for my Infinity speakers).
If you like the rear speakers to work as just a fill-in, then
I would not bother changing the rear speakers, the standard
ones are reasonable and it's not worth the effort changing them
if only 5% of the sound comes from them (especially if you have
a trunk mounted subwoofer).
Amplifier
The biggest problem with fitting the amplifier is finding a
flat surface to mount it on, a small amp could be hidden under
one of the front seats, but a large amp (The Kenwood KAC-943 I
have is 27cm square) needs to go in the boot and the only flat
surfaces are the underside of the shelf or the back of the rear
seat. Both these places move so you have to make some provision
for the cable to be able to move with them !
The back of the rear seat is probably best, you can run the cables
together in some kind of plastic conduit and the bottom of the
rear backrest is quite soft so will not pinch the cables.
When the rear seat is folded, the connections might be damaged
by luggage in the boot, so you might like to fit some kind of
cover over the terminals. For amps like the Kenwood a matching
amplifier end cap is available for exactly this purpose.Amplifiers
can run quite warm, some even have a fan so be sure to leave plenty
of room around it for it to keep cool.
There will be two power cables going to the amp, one a sense cable
from the head unit (either from a dedicated amp switch line, or
the electric aerial control line) and it's main power cable. The
amp needs to have a direct feed from the battery, at 12v a 400W
amplifier might need 30amps which is much more than the existing
cables can provide. You will have to run a thick cable from the
battery positive terminal all the way to the amp and also run
a thick ground cable from the amp to some place in the boot (there
are several earthing points available). A fuse MUST be fitted
in the power cable right next to the battery, if you don't and
the cable is pinched and short circuits then the high currents
(60A) will set fire to the car !!
Many amps will have adjustable input sensitivity which will alter
how far you have to turn the volume control on the head unit to
get the same volume. Too low and it will amplify any distortion
in the head unit, too high and it will amplify the background
noise in the head unit and that picked up from the car's own electrical
systems.
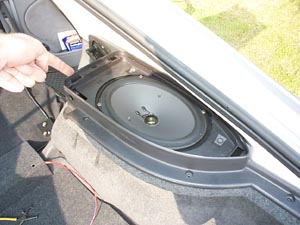
CD Multi-Player (900)
 It is best to use
the Saab mounting kit to fit the CD changer, all cars have
the mounting bolts already welded into place and you will not
have to drill any holes in the floor to fix the changer. If you
do drill holes then they remember to seal them since they are
exposed to the outside on the underneath of the car (my installer
didn't and I had to seal them myself).
It is best to use
the Saab mounting kit to fit the CD changer, all cars have
the mounting bolts already welded into place and you will not
have to drill any holes in the floor to fix the changer. If you
do drill holes then they remember to seal them since they are
exposed to the outside on the underneath of the car (my installer
didn't and I had to seal them myself).
This picture shows where to mount the cd player using the protective
cage from Saab.
Most CD changers will have switches to tell it which way you have
mounted it (horizontally or vertically), do not forget to set
them otherwise the player will skip on bumps and turns.
CD Multi-Player (9-3)
 The Saab 9-3 will
not accept third party CD changers, you have to use a Saab
original part, since the head unit and changer communicate via
a kind of LAN and have to be 'mated' via software to talk to each
other. Only the Saab changer has this firmware.
The Saab 9-3 will
not accept third party CD changers, you have to use a Saab
original part, since the head unit and changer communicate via
a kind of LAN and have to be 'mated' via software to talk to each
other. Only the Saab changer has this firmware.
Because of this you are restricted to using the Saab changer
and mounting hardware. The Cable is already run through the car.
Mobile Phone
There is a mobile
phone connector behind the heater controls, you can access it
by removing the passenger side kick panel (to the right of the
passengers feet). This might all be reversed on left hand drive
cars, but the panels are very easy to remove (a couple of screws).
The pin out is:
Pin 1 - battery (via fuse 23)
Pin 2 - ignition (via fuse 17)
Pin 3 - connected to the panel lighting rheostat
Pin 4 - hifi mute (may need to check sense of this line with
various phone / hifi combinations)
Pin 5 - ground
To get total hands free use via the Saab 9-3 head unit, you
need the following three things:
hands free kit from mobile phone company
saab hands free kit (factory option which has a different pin
out to the above)
cable adapter for your phone (from saab)
Removing the glovebox
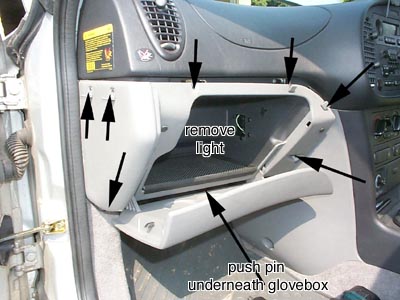 Removing the glovebox
is easy and you will need to do it to route the cables to the
head unit. First lever out the light and disconnect it, then remove
the screws as shown on the left, the push pin underneath and pull
out the glovebox.
Removing the glovebox
is easy and you will need to do it to route the cables to the
head unit. First lever out the light and disconnect it, then remove
the screws as shown on the left, the push pin underneath and pull
out the glovebox.
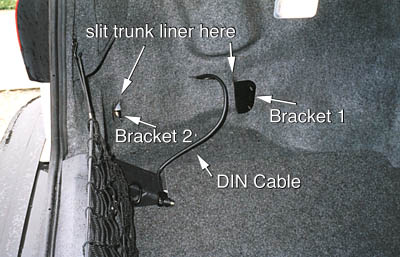
Cables and Firewall
Good cable is the key to an good sound quality. I had a similar
system fitted to a previous car, but using the existing speaker/power
cables and it sounded nowhere near as good as my current system
which uses high quality thick power and speaker cables.
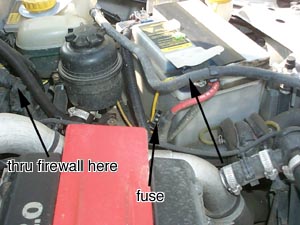
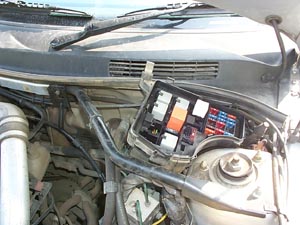
The power cables to the amplifier need to be capable of carrying
the 30-40A that the amplifier will need so a thick cable of 8AWG
should be run direct from the battery and a similar cable used
to earth the amp to a well secured earthing point. The diagrams
above show the power cable (yellow) and it's own fuse, plus the
route the wire takes through the firewall. You will have to pull
the maxi-fusebox to one side to get to a convenient place to push
the wire through the firewall.
The speaker cables should be thick and at least of Oxygen free
Copper (OFC). You can spend a fortune on speaker cables, even
using solid silver cable that will probably be worth more than
the car !!
The cables need to be fixed to the amp and speaker with good quality
terminals, gold plated ones will resist corrosion and you might
like to solder rather than crimp them for extra contact.
All material is copyright.
The Views expressed here may not reflect the views of my employer
or clients.