
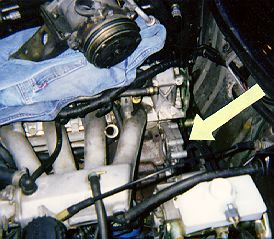
The most important parts to this job were using an original Saab aluminum radiator(75 49 298) and mounting kit(88 17 579). The new aluminum radiator was about half the weight of the original. The water pump(88 17 900), 82oC thermostat(88 17 538), 82oC radiator fan switch(85 47 572), A/C thermo-contact(40 86 724) chain tensioner(75 85 086), expansion tank(75 49 876) and heater valve(86 05 388) were replaced along with ALL hoses and clamps. Even the small bypass hose(75 04 624) and the metal pipe(93 32 826) in the top radiator hose were replaced. When replacing the heater control valve make sure that the two o-rings are seated in the grooves. If they are not you will have coolant on the driver's side compartment floor! You will have to drain your radiator and remove the four hard to get at screws AGAIN! The second time I used a small amount of gasket tack to hold the o-rings in place. The A/C(93 67 020), P/S(83 39 921), and both alternator belts(75 11 728) were also replaced along with both cooling fans. I had a small oil leak coming from the crankshaft area. Since all the belts were being replaced I had assistance in replacing the front crankshaft pulley(91 07 665) and seal, oil pump o-ring(91 25 824), and A/C idler pulley(41 18 964). After this the oil leak and whining noise from the A/C idler pulley were gone.
In replacing the water pump and timing chain tensioner I found it useful to remove the A/C compressor(not the hoses). I removed the two 6mm allen bolts and a hidden 12mm bolt behind the alternator(this took a while) and placed the compressor out of the way. This gave full access to the water pump and timing chain tensioner. I was able to remove the old water pump and thoroughly clean both sides of the housing. To remove the 'old style' timing chain tensioner required a 27mm deep socket. To install the new tensioner first soak it in a quart of oil. Screw the new one in and tighten. Pull the wire out and tighten the center bolt. The tensioner is self adjusting.
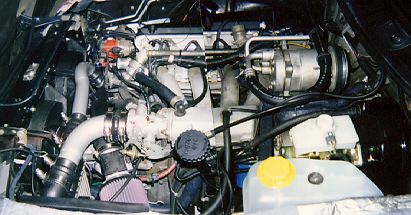
Before final assembly of the cooling system I had purchased another round of products from Group6. This time the larger turbo air ducts with the constant torque clamps and a K & N air filter. Some of the original rubber turbo boots were showing signs of wear so all four were replaced. There was also a large crack in the rubber boot(75 28 995) from the turbo to the air mass meter. It was replaced along with a new bypass valve(43 91 157). The Group6 turbo air ducts were advertised as being yellow zinc plated but when I got them they were painted black. I was sort of disappointed so I had them sand blasted and powder coated silver!
My right hand side cooling fan was still not coming on when the car reached operating temperature. The classic test is to short the two wires at the thermo-contact(85 47 572) in the upper left hand corner of the radiator. This should turn the cooling fan on but mine did not come on. The fuse and fan relay in the fuse box had been replaced along with the new thermo-contact in the radiator. From the excellent advice of Thomas Townsend I was directed to a large black relay , Time Relay for the fan circuit, clipped to the inner fender well near the air filter. I had never noticed it before and it has two sets of numbers, 898271 and 85 87 677. You don't need this relay. Remove the relay(unplug it) and bridge connections 87 to 30(at the plug). The fan should come on whether the car is running or not. Clip the two wires (BE CAREFUL AND ONLY CLIP ONE AT A TIME) from the plug and solder them together and seal with heat shrink tubing. If you clip all the wires the power circuit will ground and blow the fuse. Leave wires 15 and 31 attached to the plug and tie the wire out of the way. My cooling fan now comes on when the car reaches just above half on the temperature gauge.
The radiator was filled with 50/50 Saab original coolant and distilled water. I also added the Red Line Water Wetter. One last thing I wired the cooling fans(SBJ 1996 Vol. 21) with the override switch so I can turn on both cooling fans at anytime. The cars temperature generally reads between one eigth to one quarter on the gauge and maybe gets up to half on a hot day. There is definitely a noticeable improvement in acceleration with the Group6 ducts and K & N air filter.
As I began to drive the car regularly I noticed a few puddles of fluid still appearing on the garage floor each morning. I had gotten used to laying down newspaper or 'diapers' in order to locate the origin of the leaks. One of the easier repairs was the replacement of the oil pressure switch(91 12 459) which is located just above the oil filter. A relatively quick and inexpensive fix and that was the last of the oil leaks. There was still one last fluid leak coming from behind the driver's side wheel and I was told it was my power steering rack.