The banner above is an advertisment - if it asks you to download software, please ignore.
Site News - 4/9 Saab Owners' Convention Day Pass Raffle | 3/26 M Car Covers (by State of Nine)

Overview

Getting Started

Project Outline

Parts Checklist

Preparation

Engine Removal

Transmission Swap


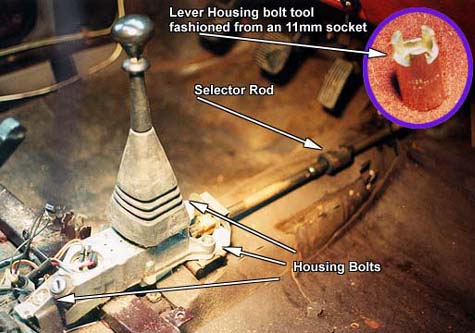
Gearshift Lever and Selector Rod

Consoles and carpet removed. 1980 900 shown, other years similar.

The shift lever housing is interchangeable between automatic and manual 900's.

A special tool is needed to remove the housing bolts which can be fashioned from an old socket.

To remove the manual lever housing and selector rod from the donor car:

  • Remove the front seats.
  • Remove the front consoles, door sill plates and front carpeting.
  • Remove the center console. The wiring for the power windows can be left connected and the center console rotated out of the way.
  • Remove the ducting that runs from the firewall to the lever housing.
  • Remove the lever housing bolts using the special tool pictured above.
  • Turn the housing on its side and remove the plastic cover on the bottom to disengage the selector rod.
  • Disconnect the ignition switch wires and remove the housing.
  • The selector rod is attached to the transmission by means of a taper pin which has a nut at one end. It can only be accessed from underneath the car. After removing the nut, the pin can be removed by tapping on it with a hammer.
  • There is a rubber grommet on the firewall through which the selector rod and emergency brake cables pass. The grommet is slightly different in the automatic car but is not necessary. The emergency brake cables must be disconnected from the handbrake lever in order to remove the selector rod and grommet from the car.
Automatic shift lever housing

To remove the automatic lever housing from the project car:

  • Remove the shift cable from the automatic transmission. Instructions.
  • Remove the automatic shift knob by using a wrench on the cylindrical nut directly under the knob. The "PRND21" cover simply pops off.
  • Follow the first three steps of the manual removal section outlined above.
  • Using the special tool, remove the lever housing bolts.
  • Note the ignition switch wiring by drawing a diagram or taking a photograph of the ignition switch. Disconnect the wiring.
  • Remove the lever housing and pull the cable through the grommet.

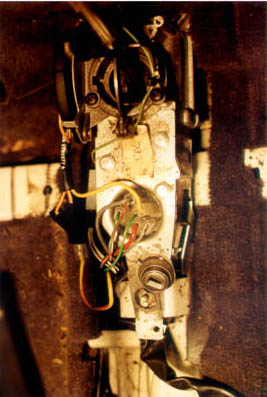
When installing the lever housing in the project car, it is recommended to wait until the engine/transmission has been reinstalled in the car. This makes installation of the selector rod much easier.

The shift lever housing contains the ignition switch and key cylinder. One may want to replace the key cylinder in order to keep the original key with the car being converted but this is not necessary. There are instructions on how to replace the key cylinder in the Bentley repair manual.

It is also suggested to switch the ignition switch itself. The ignition switch is pictured above. It is the part with all of the wires running to it. The ignition switch differed slightly over the years of 900 production so keeping the original switch with the car is recommended. Automatic and manual switches appear to be interchangeable and this author had no problem swapping the switches between housings.

When installing the manual lever housing, there will be extra wires left over from the automatic housing that seem to have no place to go. These can be left disconnected. One of these is the light wire for the "PRND21" status window on the Automatic console. The other wire is the starter motor lockout which is a system found in automatic cars that disables the starter motor when the shifter is not in "Park". Leaving this wire disconnected defeats the system. The reverse light wires are the same on both automatic and manuals and should plug right in to the reverse switch on the drivers side of the manual lever housing.