
Rebuild Your Steering Rack N Pinion Compiled from postings by B202nut (tear-down) and
SCarlson (rebuild) with permission
A common Achilles heel for these cars
is the rack & pinion leaks. First is to confirm the rack is leaking that
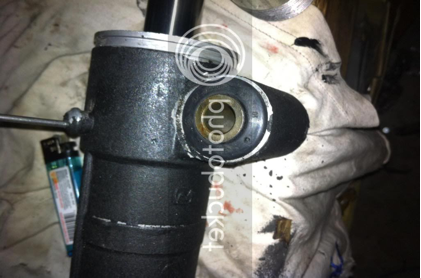
commonly manifests itself by a sway bar arch full of grease, torn inner ball
joint boots that are oil soaked, and clear evidence of more fluid at the c clip
where the rack connects to the inner ball joint. The Saab factory manual ‘s step by step
instructions are invaluable. Printing these instructions and diagrams at 11x17
is also helpful. This manual is available on Saabnet.
A
rebuild kit and new boots are required and readily available from numerous
online sources. The rebuild kit,
available from Edelman or Gates, appears more intimidating than it actually is.
Of the parts provided, it appears 80% of them will go on the pinion and a few
inner seals for the rack. All in all,
the process is very straight forward. The manual indicates special tools are
required but it can be done without them. While you are tearing the rack down,
soak the new seals and O-rings in PS fluid.
Tear-Down
(B202nut)
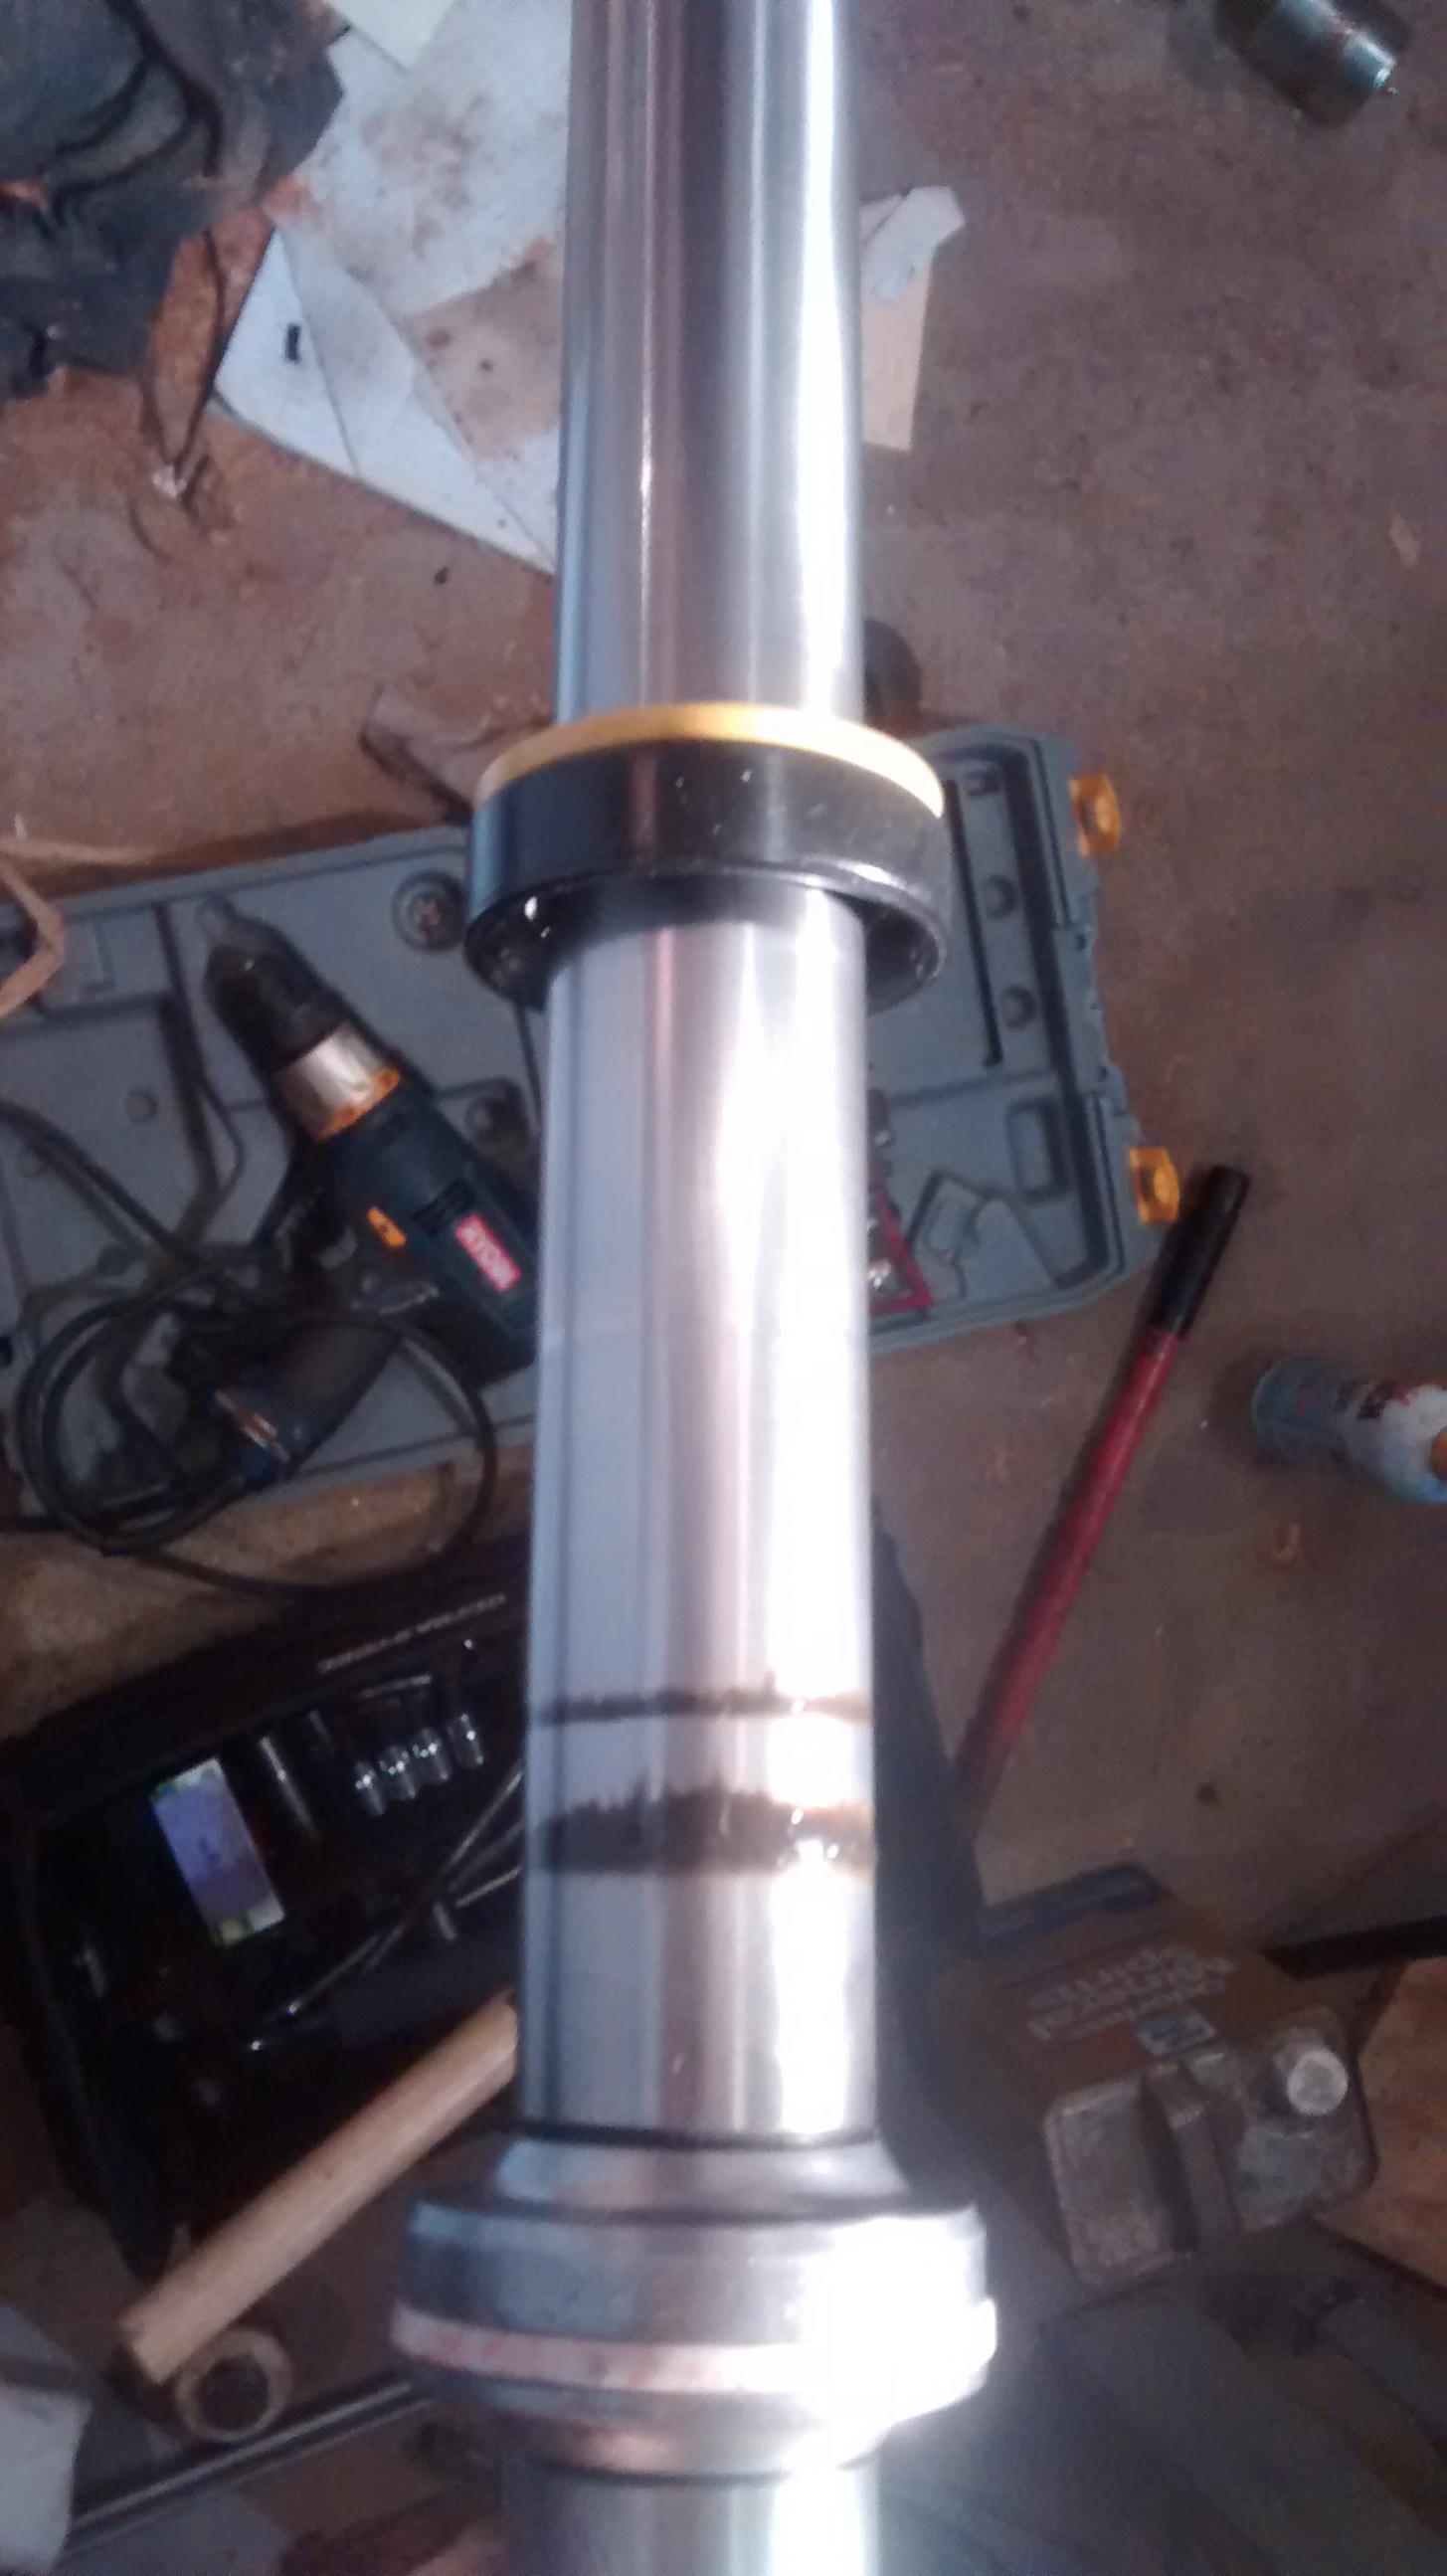
The
replacement bushings need to be pressed in and old bushings pressed out. You
may need to use a hydraulic press or visit someone willing to help. I sourced
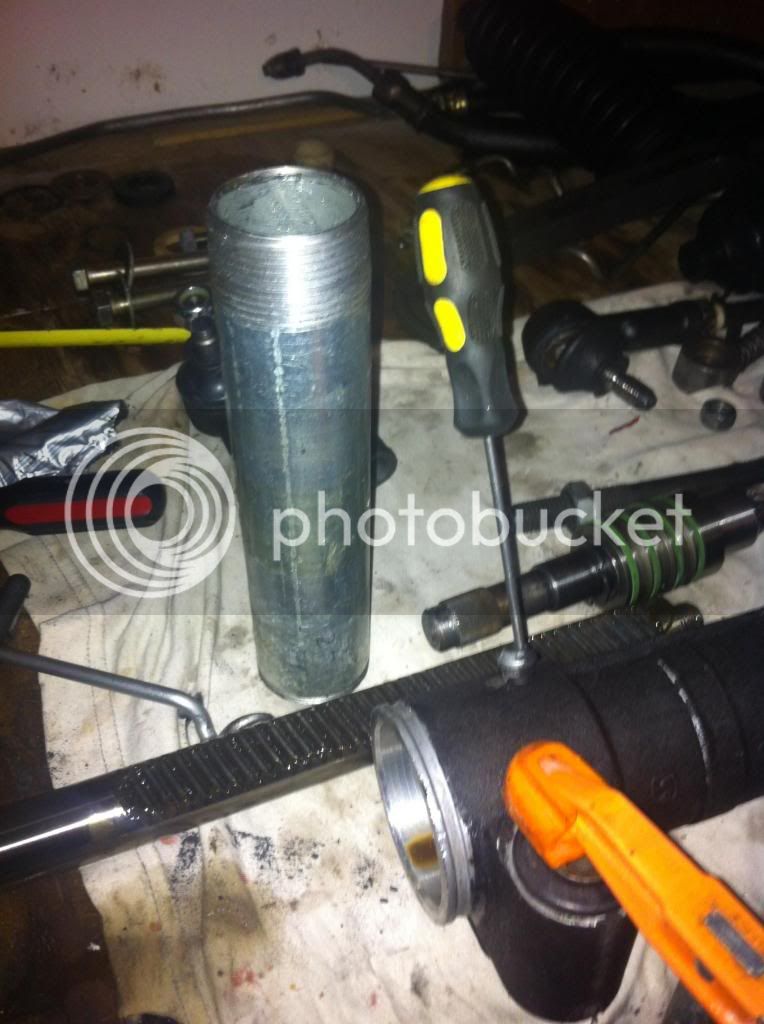
the pipe of the correct diameter to press the hydraulic seal on the rack.
Here’s the new rack bushings pressed in. Powerflex polyurethane
bushings are easier/don’t need pressing.
Removing
the snap ring was a bit of a bear but it's out. Use a metal pipe 1/4 in. ID and
7 6/16th long (exactly. This replaces the special tool to compress the
hydraulic seal to move the tip of the snap ring. Once the seal was compressed, I did the following to remove the
snap ring:
1. Use a pick tool and poke inside the nipple at the end of the rack housing
furthest from the pinion. This will move the snap ring about 1 or 2 mm (that's
it!). The available workspace is extremely tight.
2. Next, the Manual suggests using guitar string to loop the snap ring. I used
a metal tape measure bent in half to loop the tip snap ring.
3. Then used a dental pick tool to push the tape measure around the snap ring
to about 3 o'clock.
4. Then I pulled like hell until the snap ring stretched.
5. Then grabbed my big vice grips and pulled the ring out.

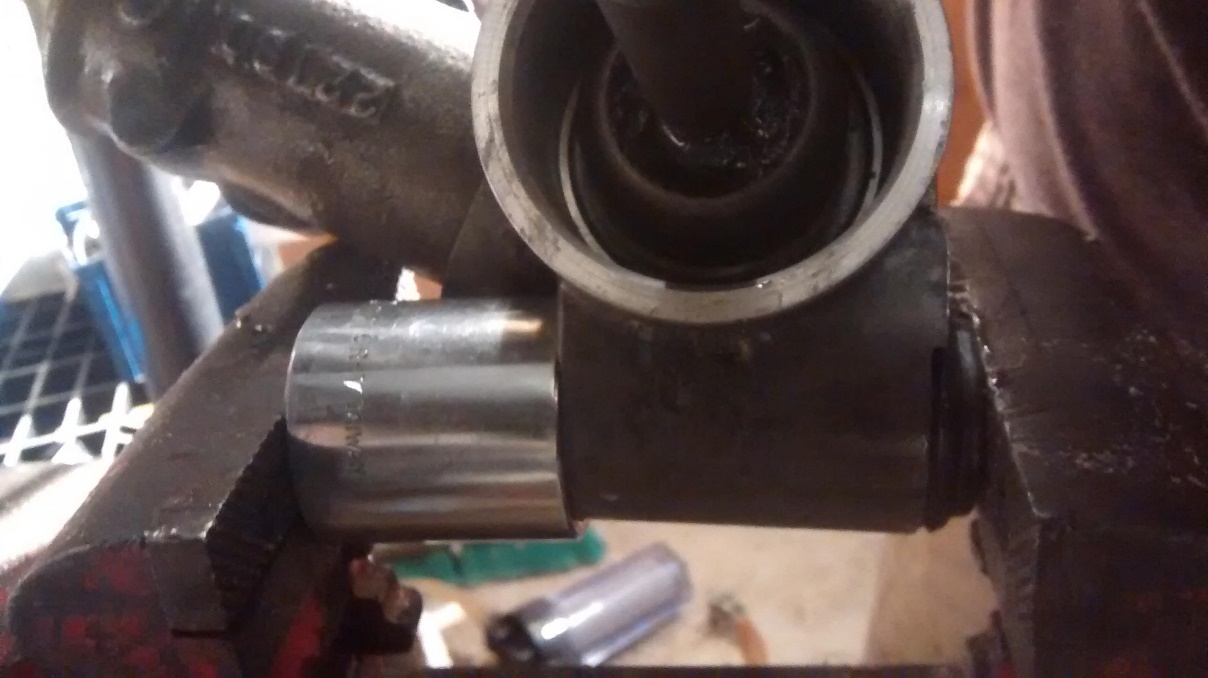
Now clean the
rack shaft and servo with kerosene and renew the rack and pinion with new
seals. This O-ring on the seal was definitely leaking.
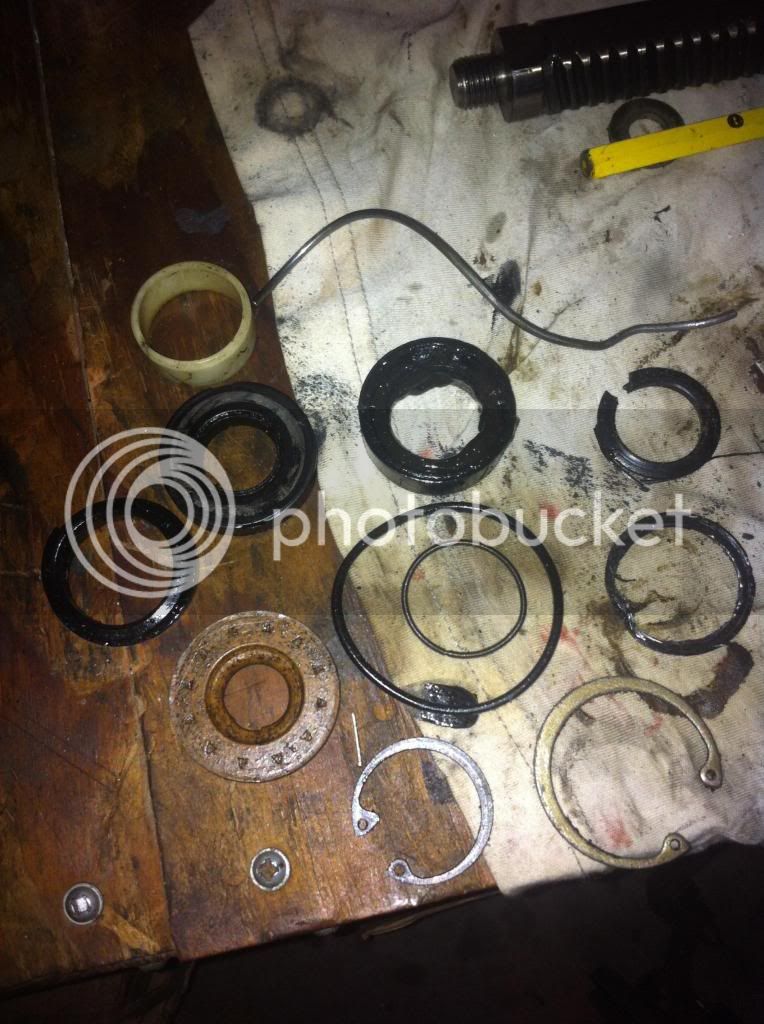
These
seals, snap rings, and O-rings will be replaced. The pinion and needle bearings
will be reused. Those seals are rack and
valve related only. None of the line O-rings have been touched yet, but all
will be replaced.
The seal
above with the lump of grease on it, lives inside the rack, about mid-way. It
needs to be pushed out from the pinion side using. 21 mm socket and a 2"
ft extension. Don't use 22mm or it could get stuck (and you don't want that....
LOL). Tap it out with a mechanics mallet.
Drop the
inner ball joints in petrol and degreaser while you get all the seals in. The
joints should be nice and clean by then. There was no play with them when
installed, so they can be re used as well.
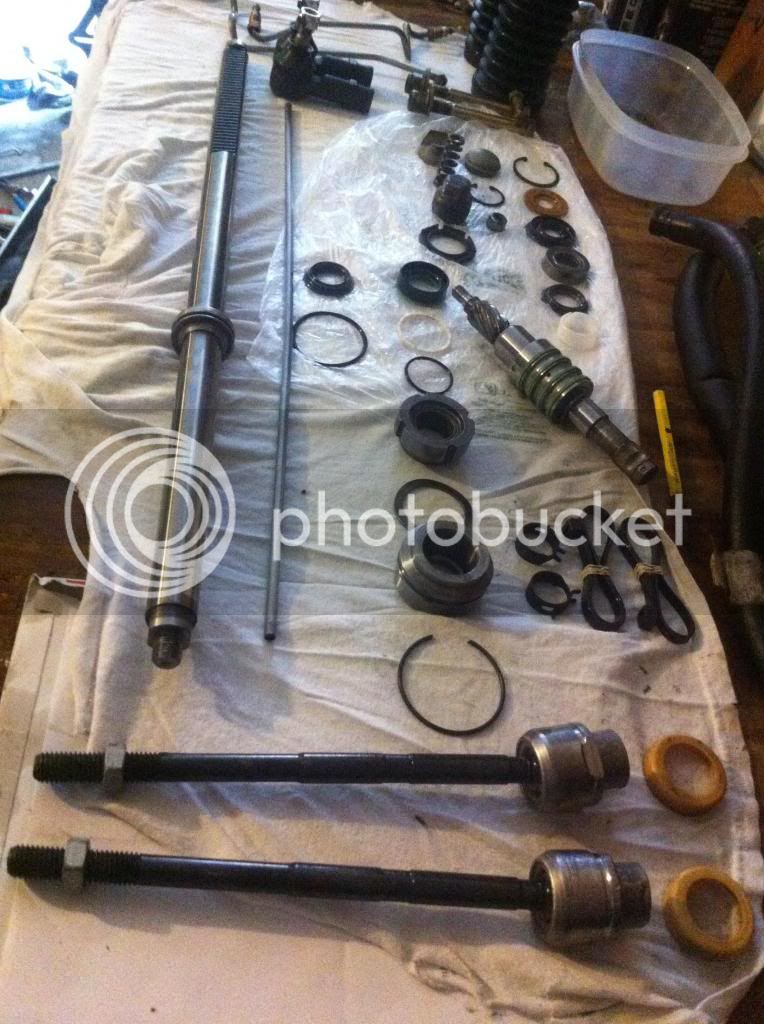
Starting on a clean Table, here is
the rack n pinion assembly line. Place all
new seals, O-rings, and snap rings, in the order they should be installed. The
rack and valve should be clean as well as that breather pipe. Also pictured are new outer tie rod ends and
boots. The servo feed and return lines should also be cleaned up. While getting
organized, the rack housing can be soaking. Being pedantic is the key to success. Take
your time, be methodical!
Be careful inserting the Teflon seals; I totally
killed the PTFE seals (Teflon O-rings) because I didn't understand how they
work. Search Google or YouTube for
instructions on these seals. To fit
Teflon O-rings properly you should boil them so that they stretch to fit and
then use your heat gun to shrink them to size. Worked like a treat...
Rebuilding (SCarlson)
The first step is always the hardest, it seems. The first seal to be installed and the little
white collar thingy that goes deep inside the pinion
housing can create some problems. But
it’s not an installation problem, per se.
This seal can be slipped in with your finger. Instead (and as widely
reported), it is because this seal, which typically comes in the kit, is the
wrong size.
I found the correct part by cross-referencing the correct seal
from other GM rack kits, because the rack is obviously a GM (or GM-derived)
rack. I bought Edelmann 8740 rebuild kit, the "cheap" one, which is
sold under other brands such as Gates and AutoZone's house brand. This is the
kit sold everywhere, under myriad different names, so it’s not that it is a
junky kit. They are literally all the same.
First seal to hammer in is the bottom pinion seal, which goes in
the pinion housing. This was also where I first ran into trouble. The seal
included in the kit was the wrong size. I also bought and returned another
kit, from a different brand and a different store, which was clearly the same
kit, with the same wrong seal. Why, Edelmann? Why?
The bottom pinion seal I took out of my original rack had the number 26005161
on it. The new seal from Edelmann 8740 was smaller - the trouble everyone
faces. So, I cross-referenced 26005161 and got "Opel Corsa, Sintra"
on a part number list. GM vehicles for sure, but not US market. Still, knowing
how GM builds foreign-market vehicles from its domestic-market parts bin, I
looked for a rack seal kit for the Corsa and Sintra. Easy enough to find, but
hard to get in the USA. More searching ensued. On a Russian website for Russian
enthusiasts of American muscle cars, the same kit was listed for Corsa and
Sintra as for a '94 Firebird Trans Am. Bingo!! This is Edelmann 8785.
The added benefit of getting Edelmann 8785 is that you can get a bunch of extra
parts, some of which will also fit the rack, so you can use them as backups. It
also includes the little white plastic sleeve collar thingy that goes inside
the pinion chamber, which will also be a different size than the one in the
Edelmann 8740 kit. Usually this does not need replacing. Use the one from the
Pontiac Trans Am kit. That's 8785 from Edelmann or Autozone or wherever. Then, use
the pinion seal from the Trans Am kit. I used a socket extension mounted
backwards on a socket. I think it's the one I use for crank pulley
installation/removal on 900 cars after 87.
It fits!! And appears to seat well in the little hole. I can feel
the hole's chamfer with my bicycle spoke pick tool. The seal and plastic collar
will be the only components I use from the Pontiac kit.
NEXT, install the rack seal. I put the Teflon seal on the rack bar
piston, with the O-ring underneath it in the same groove. Some racks have just
a Teflon seal, and the SAAB kit comes with both types. Then I put the rack bar
seal on the rack bar. The rack bar is used as a seal driver to seat the seal,
so you don't have to use a socket for this part. I put electrical tape over the
teeth of the rack to keep them from gouging up the seal, and oiled and slid the
seal down the rack bar.
Once the seal was at the end, I checked the seal to see if it was
nicked, by pushing it up the rack bar with a little oil ahead of it. I then
inspected the oil ring, to see if any oil was going past. It appeared fine.
Finally, the rack bar was ready. I pushed it carefully into the
rack housing, teeth first, and used a hammer and socket to pound on the end of
the rack bar until the seal was driven home. There is no way to tell from the
outside if this seal is seated, so you must take note of where the seal sits
when you've inserted the rack bar versus where it sits once you've pounded it
home. It should move about 5 or 6mm.
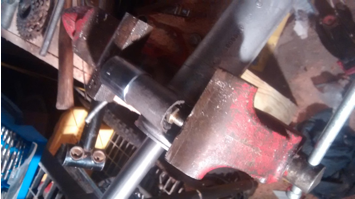
Next, I will do the bulkhead seal/wavy washer/snap ring. First, of course, you must
insert the bushing (smaller nosed end inward) followed by the wavy washer
followed by the bulkhead seal assembly, with the new seal you hammered in it
with a socket or pipe. Once these are on the rack bar and seated way down in
the rack, you will need to compress the bulkhead seal/wavy washer. I used a pipe to compress the bulkhead
seal/wavy washer, like B202nut. But I used PVC instead of metal. Easier to cut
if I got the length wrong and plenty strong enough. Also, no burrs to cut me!
The way you do this is easy. Just cut a pipe to be the appropriate length, then
put it on over the rack bar. You will need to have the driver's side inner tie
rod end screwed on. You will then screw on the passenger's side inner tie rod
end until it pushes up against the pipe, like so:
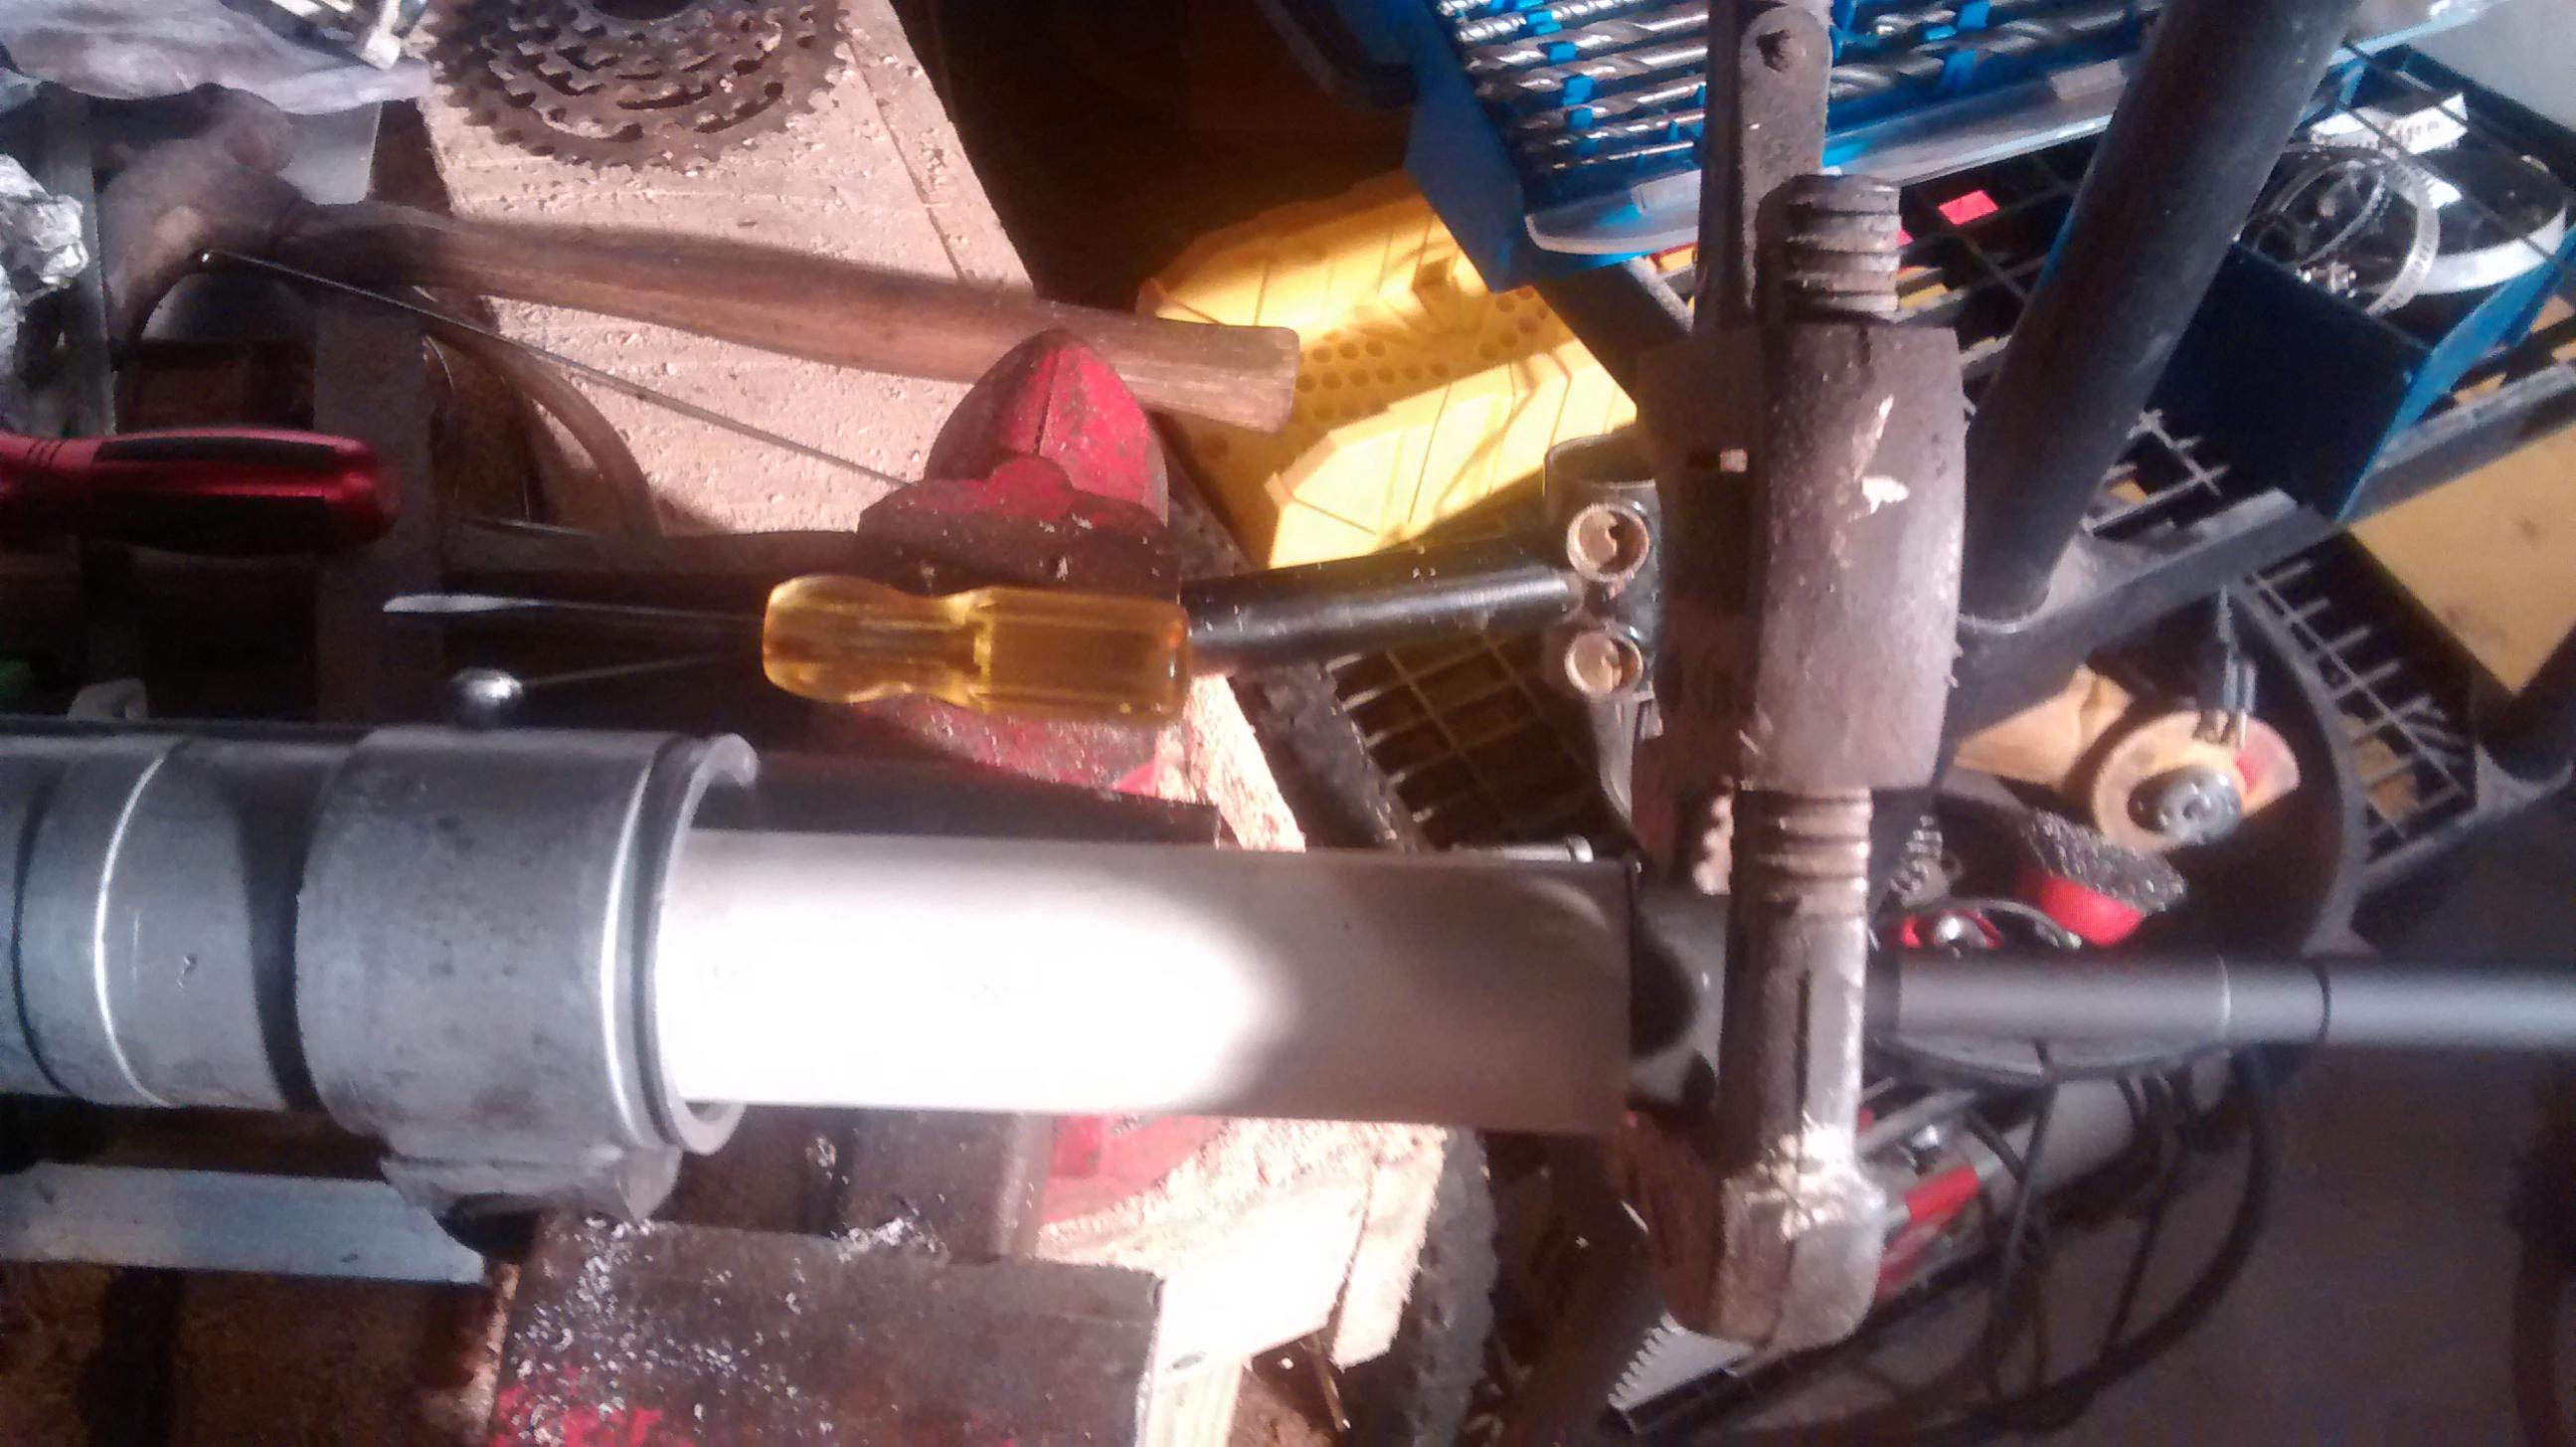
You will feel some resistance as the bulkhead seal assembly slides its O-ring
past the snap ring groove. It is good to oil or grease everything before doing this,
so you don't pinch the O-ring or anything. Once the O-ring is past the snap
ring groove, all you must do is tighten the tie rod a bit more until you can
see the groove. Then slide the snap ring in using a small screwdriver. Make
sure it's seated all the way around the rack. Luckily, they give you a new one
of these so you can ruin the old one taking it apart and not have a bad time
bending it back into the right shape, so it seats properly.
Next, the pinion goes in!
On
pressing the bushings in, B202nut got this wrong when he said you need a press.
Then again, I've been working without any presses for years. It's just a fact
of life for me, the necessity to think outside the box. Humblebrag aside, it
really is easy.
To press the old ones out, just take a big socket (big enough that the bushing
can go in it) and put it on the bottom side of the rack, then find a bolt that
is nice and short that your vise can push against, clamp the stack of
rack+socket +bolt together, and start cranking. You could probably do this with
a C-clamp too. These are not really in there that hard.
N.B.
the bushings can only come out the bottom and are directional. The end of the
bushing with more metal showing is fatter than the hole in the rack and can't
go through the hole and should be against the car's frame when the rack is
installed. Once you've got the bushing halfway out, you can just clamp the
bushing in the vise and yank on it until it slides out.
Then put in the new bushing. I use dish soap to lubricate them because people
say oil is bad for them. Apply soap, clamp bushing+rack, and crank until
through.
Finally, this won't push the bushing in completely. So, you'll
have put a socket on the end and push the bushing a bit out the other side,
like so:
Boom, you're done. Spool valve next. I promise.
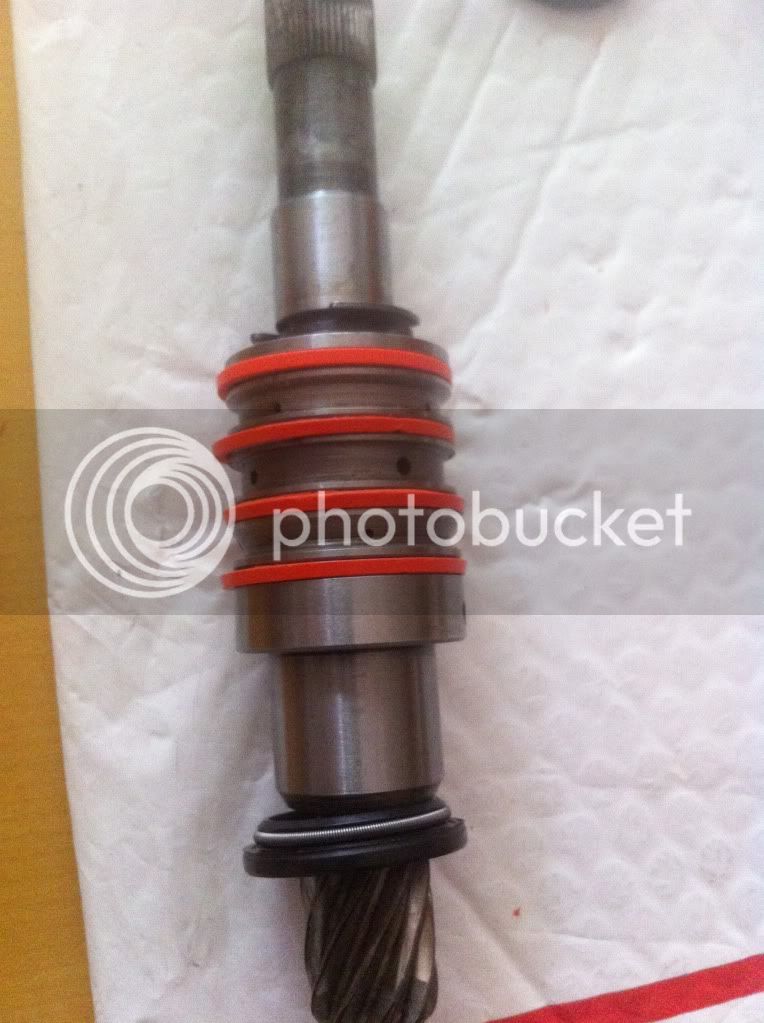
First, I'll say, those directions by B202nut to use heat to form
the Teflon O-rings: not the thing I did. I pulled the old ones off and put the
new ones on by gently stretching them by hand. Just enough so they'd go over
the spool valve and into their grooves. But then they were really loose. What
to do??? Allow me to show you my marvelous solution:
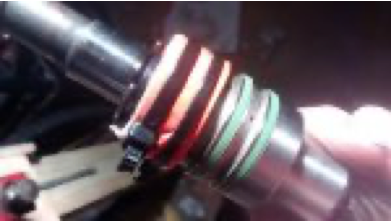
I zip-tied cardboard around the seals and then really cranked on the zip ties.
I bet you could use hose clamps, but zip ties have less chance of cutting
through the cardboard and into the vulnerable PTFE.
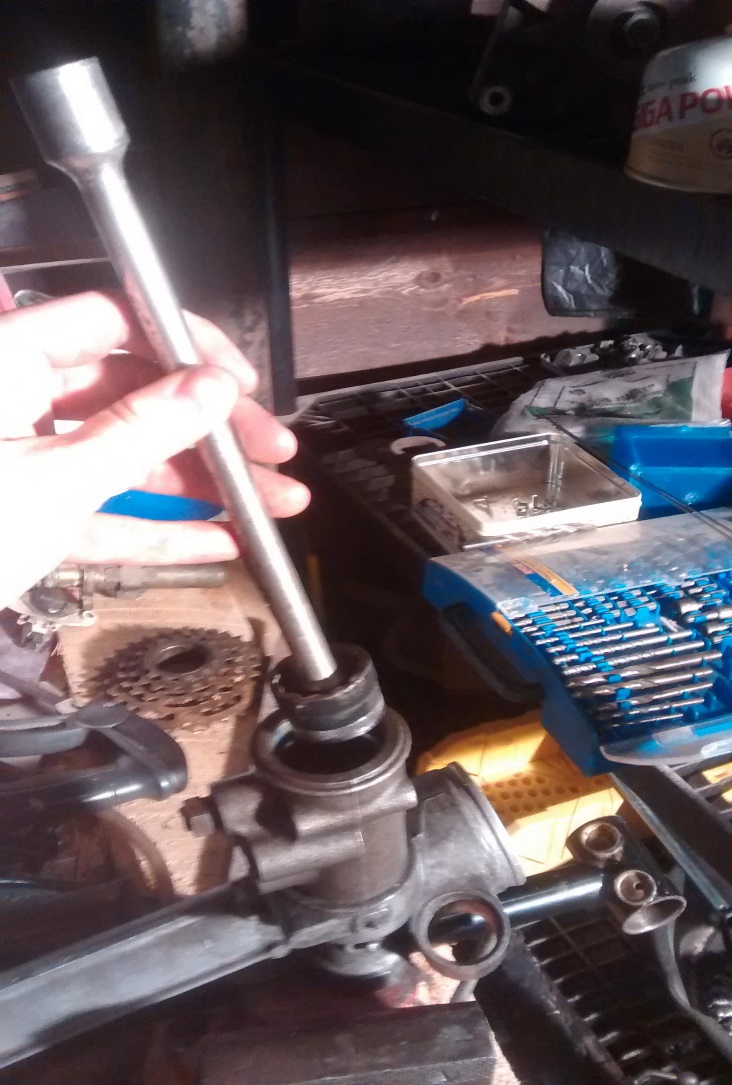
Then use socket to seat the lower bearing. Put in the lower
bearing's snap ring.
Then put the spool valve in. Repair manual says it better than I
could, so here's a screen shot.
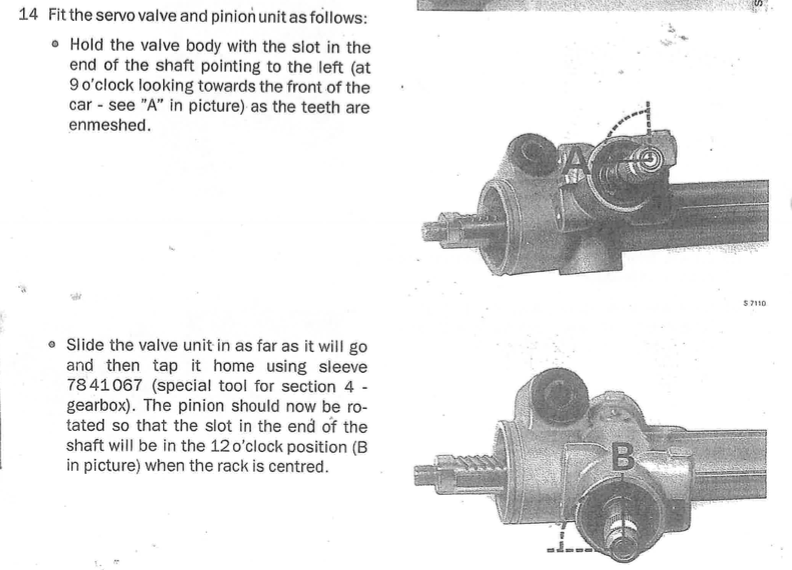
Basically, first make sure the rack is centered (about 39mm
sticking out either side, not counting the threads). Start the pinion/spool
valve with the notch facing left (9:00), then the helical-cut pinion will turn
90 degrees as you insert it and end up facing up (high noon). You'll feel the PTFE
seals slip past the chamfer inside the pinion housing as you push it in. If it
doesn't go in by hand, STOP and figure out why.
Drop in the roller bearing and then hammer home the two upper seals with a
socket. Put the upper pinion snap ring in. Tighten the bottom nut, put the cap
on. Make sure things are well-greased. I used black moly lithium grease. It's
probably overkill but it's all I had lying around.
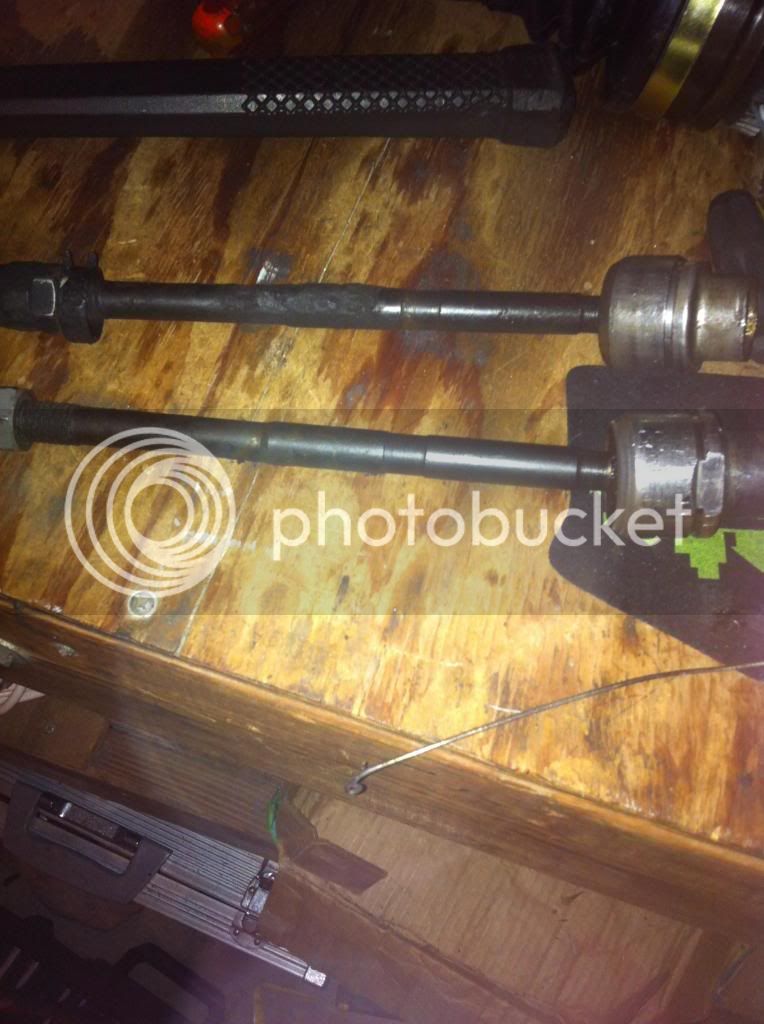
Screw on the tie-rod ends. It is pointless to re-use your old ones. New ones
are cheap and nearly impossible to change in-car. Why take the risk? Use a pipe
wrench on their flats. Tighten to 75 ft-lbs (wheel nut torque if you're doing
things by feel because you lack a ginormous crowfoot). Peen the sleeve part
over the flats of the rack using a large punch.
Putting on the tie-rod boots should be done last. It is something I really do
have an opinion about. First, don't reuse your old tie rod boots. Seriously
don't be a nincompoop. They are vulnerable rubber, and really hard to change
when the rack is in the car. Then, you must check the boots you have purchased.
A lot of them don't come with the holes for the pressure-equalizing tube
punched all the way through. You must ensure that they have been punched, or
your rack boots will. Blow on the hole with your mouth. I'm serious. They are a
pain to do in-car, so you have to make sure they work now. Remember the
pressure-equalizing tube. It should run under the two hard lines on the rack. I
don't like the zip ties that come with most rack boots, so I managed to reuse
the original metal band clamps. They can be tightened with end-cutters provided
you do not accidentally cut them.
More Regarding the Teflon Seal Size (SCarlson)
Question: When you removed the
piston ring from the rack shaft, was there a thin Teflon seal with an o ring
under it? That’s what my car had, but I wasn’t sure if it was rebuilt by
someone in the past, maybe incorrectly?
The manual isn’t very clear.
I assume the later models used the thinner (white speckled) Teflon seal with
the O-ring under it which helps adjust for uneven wear of the Teflon seal.
whereas the original rigid Teflon seal in a sliding seal environment would
potentially become leaky. I think that
kit is up to year 1988.
Response: You are correct. Later cars seem to have the PTFE seal with O-ring
under. This is not reverse compatible. If yours had an O-ring under a PTFE seal
that's what must go back in. It's impossible to fit the solid PTFE seal to a
car that came with the O-ring under PTFE, and impossible to do the opposite as
well. I am pretty sure your rack is stock. Newer cars of other make (not Saabs)
also use O-rings under the pinion seals as well.
Question: Did you slit your pinion seals as per the
manual?
Response:
Oh, Hell no! I think the slitting procedure is a modification to
allow the seals to seal better against a worn aluminum housing. With the cast
iron housing, I think it's not necessary.
Return to The Saab Network


The content on this site may not be republished without permission. Copyright © 1988-2025 -
The Saab Network - saabnet.com.
For usage guidelines, see the Mission & Privacy Notice.
[Contact | Site Map | Saabnet.com on Facebook | Saabnet.com on Twitter | Shop Amazon via TSN | Site Donations]