|
|
|
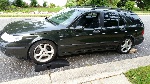
step 1
car on ramps
Last modified: Sep 22, 2014 |
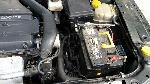
step 2
remove battery safety nut 13mm socket. Other end of saab strap slides out of bracket later on.
Last modified: Sep 22, 2014 |

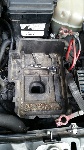
step 3
disconnect battery, negative first. 10mm socket
Last modified: Sep 22, 2014 |
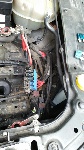
step 4
remove battery tray, 3 10mm bolts
Last modified: Sep 22, 2014 |
|
|
|

step 5
remove first cable bracket I think 10mm
Last modified: Sep 22, 2014 |
step 6
pull maxi fuses and small wire that connects to positive terminal (10mm)
Last modified: Sep 22, 2014 |
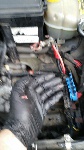
step 7
slide the blue half down. i think. wear thick gloves!
Last modified: Sep 22, 2014 |

step 8
Dress wound from step 7. Go back outside and remove bolt and positive cable retainer clip near auto trans dipstick, 13mm socket. put bolt back loosely for safekeeping
Last modified: Sep 23, 2014 |
|
|
|
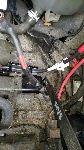
step 9
picture from above brake fluid reservoir. no room to get bolt out! From the top, feed the new cable along the path of the original cable
Last modified: Sep 22, 2014 |

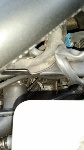
step 10
under car. remove nut on starter motor, 13mm socket no extensions (no room for them)
Last modified: Sep 23, 2014 |

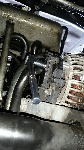
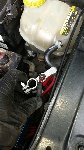
step 11
and 13mm nut on the alternator end (shown removed). it's the bolt on top, have to feel the original cable behind hoses to make sure you remove correct one. lower bolt at bottom of picture stays put.
Last modified: Sep 23, 2014 |

step 12
alternator end of original cable, doesn't look that great.
Last modified: Sep 22, 2014 |
|
|
|
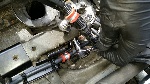
step 13
at first I connected new cable to starter very loosely so that you could twist the cable to reach the alternator. then tighten the alternator connection then lastly tighten the starter connection and get out from under the car, or change oil at this point
Last modified: Sep 22, 2014 |

step 14
new cable has its own maxi fuse plastic connector. just slide the blue half back into the new black half.note the little nut from step 6 that was on the original cable is transferred to the new cable, new cable doesn't come with one (top of this picture)
Last modified: Sep 22, 2014 |
step 15
attach metal bracket with 10mm bolt that was removed in step 5
Last modified: Sep 22, 2014 |

step 16
I had to slide the clip a bit to line it up (took some effort). fit it with bolt that was removed in step 8
Last modified: Sep 22, 2014 |
|
|
|
step 17
replace saab strap into new cable bracket
Last modified: Sep 22, 2014 |
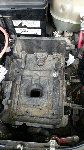
step 18
replace battery tray, 3 10mm bolts
Last modified: Sep 22, 2014 |

step 19
I was charging my battery out of car for a good couple hours during this time. put battery back and secure with strap and 13mm bolt
Last modified: Sep 22, 2014 |
step 20
clean battery terminals and negative cable end. replace wire to top of positive battery terminal. connect + to battery first, - last
Last modified: Sep 22, 2014 |


