1999-2009 [Subscribe to Daily Digest] |
 Members do not see ads below this line. - Help Keep This Site Online - Signup
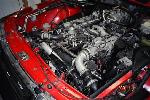
I replaced the brake booster on my 2003 Aero over the weekend. I consider this to be the most difficult DIY job I've done to date. Others I've done include brake pads & rotors, oil changes, coolant replacement, rear shocks, coolant bypass valve, thermostat and temperature sensor, spark plugs, xenon headlight bulbs, window rollers, cabin air filter, etc.
I ordered the OEM ATE booster from RM European for $185.
I read several threads here and elsewhere as well as the Haynes manual description of the job before tackling it. Two methods are described, one in which you remove the booster by removing the 4 nylon lock nuts attaching it to the mounting bracket, and an "easier" method where you remove the booster and bracket as a unit by removing the 3 bracket-to-chassis bolts. I prefer things to be easy so I set out to do the bracket method.
That method is written up by a fellow named "Frans Swaalf" and can be located by googling "frans swaalf booster". Saabnetter "Mark in Marine" also posted some thoughts on this job which heavily paraphrases Mr. Swaalf's. In summary, you must remove or loosen & move aside several items from the engine bay - battery & box, fuse box, master brake cylinder, the little electrical box thingy that's attached to the frame behind the engine, and the hood-closed switch. Additionally, you must remove the windshield wipers and the plastic bodywork at the base of the windshield to access the upper bracket mounting bolt. The other two bolts are accessed from below the car.
Rather than a complete rundown, here are some hints & tips:
Per a tip from a previous poster I got a Lisle "battery terminal and wiper puller" which popped the wipers off with ease. Highly recommended tool for $20 even if you never use it again.
Wear gloves. My personal favorites are Klein brand "journeyman" framer gloves which have exposed thumb, pointer, and middle finger. They protect most of your skin but leave those fingertips out for fine work.
The master cylinder is quite tough to pull out from the booster. It won't seem like it's going to make it, just pull firmly out and towards the driver's side and it'll make it. Be careful that the fabric line that goes out of the brake fluid reservoir on the driver's side (for the clutch I believe) doesn't pop off - mine did during reassembly.
To get the lower bracket mounting bolts, I had the car on regular Rhino Ramps and was able to use my normal 3/8" wrench, about a 6" extension, and socket. Left arm up between the various chassis & suspension bits, right arm pointing a flashlight up to locate them. It's tight but not the worst part of the job by far.
Once that's all disconnected, get inside the car and remove the interior panel underneath the steering wheel. Remove the brake pedal return spring (a small metal wire comes down from a radial type spring, just pop it off) and then push the pedal forward. Use something to tie it off to the steering linkage so it stays depressed.
Now you should be able to pull the booster & bracket forward. From the driver's side, you can reach in and pop off the retaining clip from the piece that goes between the booster and the brake pedal. It screws into the booster and fits over the link from the pedal, the clip in the middle secures the pedal's side. Pop that clip off (don't lose it apparently they're hard to source) and pull the booster off the linkage. If necessary go back in the car and pull the brake pedal back in.
At this point you're supposed to be able to squeeze the booster with bracket attached out of the car. I found this impossible. However, at this point it was loose and there's enough room to rotate it around and remove the 4 nylon lock nuts holding it to the bracket. So I did a hybrid method - take those off and now the bracket and booster can be pulled out individually. The booster was still quite tight (coming forward, under the one rigid brake line) but it came out.
FWIW, removing those 4 nuts without getting the whole assembly disconnected also seems impossible. I've seen folks say they did it with a 13mm stubby ratcheting GearWrench but man is it tight. Also don't see how you could access the linkage to the pedal if everything was still in place there.
Reassembly was fairly quick. Be sure to measure the position of the coupling piece on your old booster and make the new booster match it, if it's off you might have issues with your brake lights. I did not replace the vacuum line that goes to the booster, the existing one was in very good condition.
Tough job, I spread it out over 2 days and not including a trip to Home Depot to get a tap (threads on the bracket got messed up somehow, had to fix them during reassembly) I spent a good 5.5 hours, including test drive and cleanup at the end.
Was it worth it? The cost quoted by my very competent and reasonably priced indy was $780, so I saved upwards of $550. For that and the satisfaction of a job done and lesson learned I'd say yes. Not for the timid though ;)
jeff
->Posting last edited on Tue, 18 Sep 2012 13:01:40.
 , Wed, 19 Sep 2012 04:57:18
 , Tue, 18 Sep 2012 15:07:14
No Site Registration is Required to Post - Site Membership is optional (Member Features List), but helps to keep the site online
for all Saabers. If the site helps you, please consider helping the site by becoming a member.
 |
 |
 |
 |
 |