1979-1993 & 94 Conv [Subscribe to Daily Digest] |
 Members do not see ads below this line. - Help Keep This Site Online - Signup
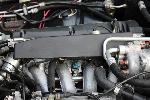
While its still fresh. I just completed my 3rd alt. bushing replacement, in less than a year, this morning. Took a whole 4hrs, with one mess up, see tip.
Alternator bushings replacement (2x adj. bracket, 2x main mount)
1. Disconnect battery
2. Drain out half of the coolant, at least below the pump
3. Remove two heater hoses from firewall, place out of the way between the front two intake runners.
4. Remove fan belts from a/c and alt. (upper pulleys only)
5. Remove upper tensioner bolt from alt. tensioner arm completely
6. Remove lower bolt from alt. tensioner arm, remove arm with 2x bushings
7. Remove lower a/c bracket 12mm hex bolt, standard 6-pt wrench works just fine.
8. Remove upper SHCS (2x), 8mm allen key, from a/c bracket
9. Disconnect a/c from wire harness, cut wire ties to main harness
10. Flop a/c over onto a blanket covering the fresh air intake
11. Remove/place out of way the top two hoses on the water pump. One can be removed, the other needs to be placed out of the way
12. Disconnect alt. from main wire harness, repair any questionable connections
13. Remove SHCS, 6mm allen key, from front (radiator side) of alt. bracket
14. Remove SHCS, 6mm allen key, from lower side of alt. bracket
15. Remove alt., take to bench clean off years of c**p
I found that the 17mm bolt/nut holding the alt. bushing on requires a breaker bar, I actually had to use a propane torch this morning to loosen things up.
Installation is reverse, with one important tip.
When you get to install the alt. bracket w/ alt, briefly reinstall the upper hex bolt (the one thru the a/c bracket) so that you maintain alignment while you torque the other socket head cap screws (SHCS). If you don't align the bracket with the upper hex bolt the bracket WILL rotate and you will not get the hex bolt to start threading when you do get around to it with the a/c install.
The major PITA's are of course getting the fan belts back on. I highly recommend you install fresh belts. 'Cause you don't want to have to do it more than necessary.
Just for grins you could also get out your trusty 27mm deep socket and check to see how far your timing chain tensioner has extended. But, then again why seek out bad news.
YMMV,
Ed S
1985 900T
No Site Registration is Required to Post - Site Membership is optional (Member Features List), but helps to keep the site online
for all Saabers. If the site helps you, please consider helping the site by becoming a member.
 |
 |
 |
 |
 |