1999-2009 [Subscribe to Daily Digest] |
 Members do not see ads below this line. - Help Keep This Site Online - Signup
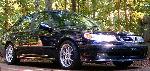
2003 Aero Wagon work, autobox, 58,000 miles
Replaced serpentine belt an three pulleys.
Fitted the new 'diesel' intake.
Replaced broken rubber isolator on the air cleaner housing.
Installed the newer high flow 'diesel' paper air flow element [now standard].
Installed new engine torque arm.
Cleaned MAF.
New fuel filter.
Cabin air filter.
Fuel line retention clamp installed.
New tires: 225/45R-17 Firestone Firehawk Wide Oval Indy 500 XL
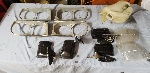
Front rotors and Akebono pads.
Rear Akebono pads.
Koni FSD struts/dampers
Corrected rear camber by elongation of the upper lateral link holes in the lateral links. If the joint slips, worst case is the old caber setting.
Wheel alignment.
I am very happy with the petal feel and effort of the Akebono pads. The feel improved as the rear pads bedded down on the old rear rotors.
The new tires are a performance tire, but not extreme, they are quiet and smooth. These tires are very affordable and get very good test results and reviews at
TireRack. I am tired of problem child expensive ultra high performance tires that are rough and harsh.
The FSD dampers ride smooth, but stiffen up when things get rough.
Cleaning the MAF and the intake update did lead to a power increase over time, there must have been some adaption.
Rear camber is now -.75 and -1.08. These were my measurements with a machinists level with vernier scale. The alignment machine indicated .6 and 1.1 . During the alignment, the tech, a really great guy who had worked on Saabs before, loosened the top bolt on the 0.6 side and the joint jumped to 1.1 on its own. That was a good omen. The steering had felt vague since a construction zone hit and the toe in was toe out. That was corrected and everything else was on spec.
Rear ride height is ~600mm [610 ref], this is a wagon, full size spare and the heavy cargo mat. Will probably install spacers later on.
Installing the struts:
You must have a 7mm hex key to take down the factory struts. Most hex key sets do not include 7mm. Also needed to remove caliper slide pins.
To remove the rear top nut, you need a 17mm DEEP offset wrench.
To remove the front top nut, you can use a 'large' spark plug socket, one with a hex profile on the other end.
The front Koni threads are the same as stock and Koni supplies nuts that have a larger hex size. Use the original nuts so you can use the spark plug socket.
You must have a 17mm thin wrench to keep the sway bar ball joint from turning.
With the right tools, it can still be difficult to remove the front strut nut. Before you jack up the vehicle. Remove the three bolts that secure the strut mount, it will not go anywhere. Set the cover plate aside. Run the three bolts back into the mount. Put some penetrating oil on the nut and exposed threads. Start to back off the nut, you do not want to remove the nut! But note that if you did remove the nut, the spring would not go anywhere, the vehicle weight is compressing the spring.
Now that the nut is freed up, break the wheel bolt tension, jack up the vehicle by the nose lifting point, remove wheels and remove the strut.
Use a Dremel wire brush to clean up the sway bar ball joint threads. Apply anti-seize and rust preventative after torquing. Those threads are not plated.
Front end is 20-25mm low, I need ideas to correct this. One should also be able to install a spacer between the strut mount and the strut tower, with longer bolts. I am concerned that rubber spring spacers will simply compress over time.
Vehicle is ready, now for a 2000 mile road trip for surgery in Canada.
posted by 70.133.21...
 , Thu, 1 Sep 2011 10:17:01, Wed, 3 Aug 2011 08:47:03
 , Wed, 3 Aug 2011 12:37:13, Wed, 3 Aug 2011 14:10:13, Wed, 3 Aug 2011 12:29:14, Wed, 3 Aug 2011 08:32:08, Tue, 2 Aug 2011 21:05:05
No Site Registration is Required to Post - Site Membership is optional (Member Features List), but helps to keep the site online
for all Saabers. If the site helps you, please consider helping the site by becoming a member.
 |
 |
 |
 |
 |