1985-1998 [Subscribe to Daily Digest] |
 | [Main 9000 Bulletin Board | BBFAQ |
Prev by Date | Next by Date | Post Followup ]
Member Login / Signup - Members see fewer ads. - Latest Member Gallery Photos
Success! I have just one word for you : Cobalt! Posted by Bill Homer [Email]  (#3427) [Profile/Gallery]
(more from Bill Homer) on Fri, 7 Dec 2012 16:12:37 (#3427) [Profile/Gallery]
(more from Bill Homer) on Fri, 7 Dec 2012 16:12:37

In Reply to: Re: Manifold studs, drill in place with drill guide., BobS, Sun, 2 Dec 2012 19:48:07 Members do not see ads below this line. - Help Keep This Site Online - Signup |
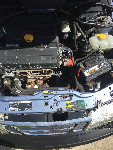
I tried putting another stud in the extra hole that I first asked about, used a large washer to hold the manifold down and it worked temporarily: the washer bent and I didn't want to put something too strong on an area that was not designed to be held down - there really isn't much a flange in that location of the manifold, plus I was not sure what would happen with a heat conductor there.
Summoning up some courage, I decided that I was going to attempt to drill out the two broken studs, and try this first with the manifold in place. I recently acquired some air tools and one was a small drill (a great time to try it out!) small, light and powerful. I went to the local hardware store and bought an Irwin (made in USA) Cobalt 5/32" 135 degree (yes, this matters as they slide around a lot less than normal angled bits) drill bit, an Irwin #3 Extractor (a.k.a. EZ-Out), a 1/4" barbed to 1/4" NPT hose fitting - ready. After removing the radiator fan I went to work.
The hose barb was just a bit small for the manifold hole, so I wrapped the threaded part with some metal tape to enlarge is a bit - perfect fit. I then started drilling, checked the work early and saw that the hole was not starting in the center of the stud - what happened? I discovered that the hose barb is not a precision made piece and that the bore is not exactly straight through the center, but is cocked to one side - oops! Then I used a larger bit, about the size of the hole through the manifold, to clean things up and create a depression in the center of the stud (which was broken off at the surface of the head); the hole through the manifold held the large bit in place perfectly. With a good starting point, things went much better and I carefully drilled freehand into the stud about 1/2" (the depth of the stud in the head is about 3/4") - cobalt bits are amazing. Then I sprayed it with CRC Freeze Off and whacked it with a hammer on a large nail inserted into the drilled hole - basically any and all removal techniques at once. Put the extractor in place and the stud came out with barely any resistance! The second one took about half the time of the first, also came out easily after again struggling with the initial setup.
To finish up, I put in a couple of new Dorman 8M studs, the same as Ray used, some split ring lock washers and brass nuts, tightened them down and the exhaust leak appears to have been fixed! There is still something resonating at about 1800 RPM, but there no longer appears to be a leak at the exhaust port of the #4 cylinder.
Thanks to all who contributed ideas, I used most of them!
posted by 108.71.134...
, Fri, 30 Nov 2012 09:34:12, Fri, 30 Nov 2012 14:00:45, Fri, 30 Nov 2012 21:56:23, Fri, 7 Dec 2012 16:12:37 <-- Viewing This Message
No Site Registration is Required to Post - Site Membership is optional (Member Features List), but helps to keep the site online
for all Saabers. If the site helps you, please consider helping the site by becoming a member.
 |
 |
 |
 |
 |