Click Banner for Details on this Saabnet.com Classified Site News -
11/25: Special Ad Rate |
11/1: Members: Log In to See Fewer Ads!
Site News -
11/25: Special Ad Rate |
11/1: Members: Log In to See Fewer Ads!
 [General |
Members |
C900 |
9000 |
NG900 & OG93 |
93 |
95 |
NG95 |
99 |
Sonett |
Vintage Models |
Clubs |
Other Cars |
FAQs |
Gifts |
Member Photo Galleries |
Member Directory |
Classifieds |
Manuals |
*Buddy Registry |
*Mileage Registry |
Polls |
What's New |
Raffle |
Photo of the Month |
Sponsors]
[General |
Members |
C900 |
9000 |
NG900 & OG93 |
93 |
95 |
NG95 |
99 |
Sonett |
Vintage Models |
Clubs |
Other Cars |
FAQs |
Gifts |
Member Photo Galleries |
Member Directory |
Classifieds |
Manuals |
*Buddy Registry |
*Mileage Registry |
Polls |
What's New |
Raffle |
Photo of the Month |
Sponsors]
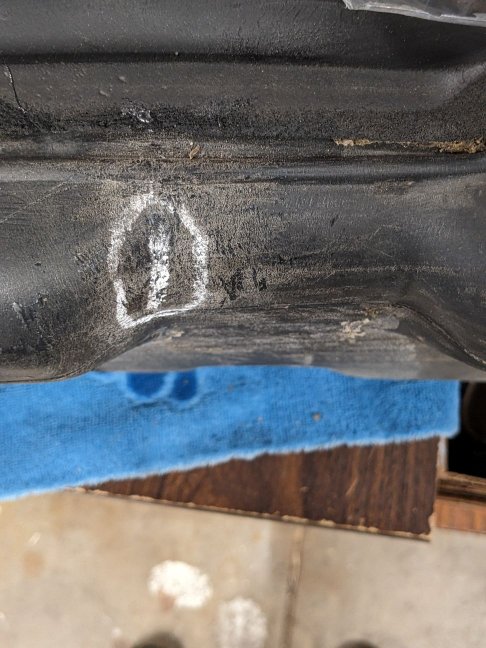
I just finished repairing my 91 Vert plastic tank last week with the typical crack along the top where the strap rides. So far so good...seems to be holding.
Saab C900 Fuel Tank Repair
Tools/Materials:
Sandpaper
Alcohol (cleaning)
InfraRed Thermometer (optional but very helpful)
Heat Gun or Hair Dryer (or a hot summer Sun)
Tech Bond (tbbonding.com)
- PTFE Tech Patch
- Poly Prep
- Activator/Accellerator
- SI Black Adhesive
This documents my second attempt to repair a small crack in the top of the fuel tank that doesn't leak fuel per se, but makes the interior of the car smell like a gas can. The first attempt with JB Weld's Special Stuff Made for Plastic did not work.
1. Crack identified by blowing air into the tank (cover tank openings with plastic and rubber bands) with a vacuum cleaner hose (carefully...it tends to inflate the tank) and spraying water across the suspect area. Bubbles identify crack. Per instructions, drilled a 1/8 inch hole a little above and below the crack to prevent crack from spreading.
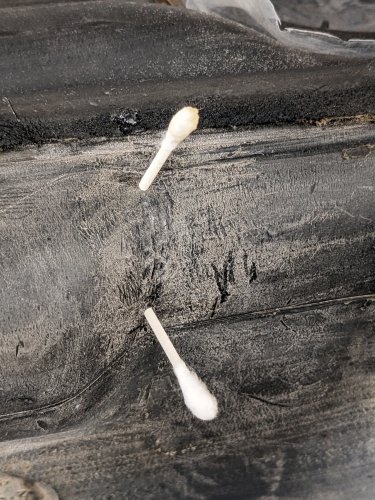
2. Area prepped for patching with a file to rough up, then sandpaper. Cleaned up with alcohol.
3. Left the tank sit in the hot sun for awhile to raise temperature. Attained 153deg which was a bit to hot so left to cool for a bit. Also used the heat gun during the overall process from time to time, but liked the way the sun warmed up the entire tank not just one spot.
4. To begin, I applied three coats of the adhesive on top of the crack and filled in the drilled holes. Finish off by applying activator. The instructions call this "plussing".
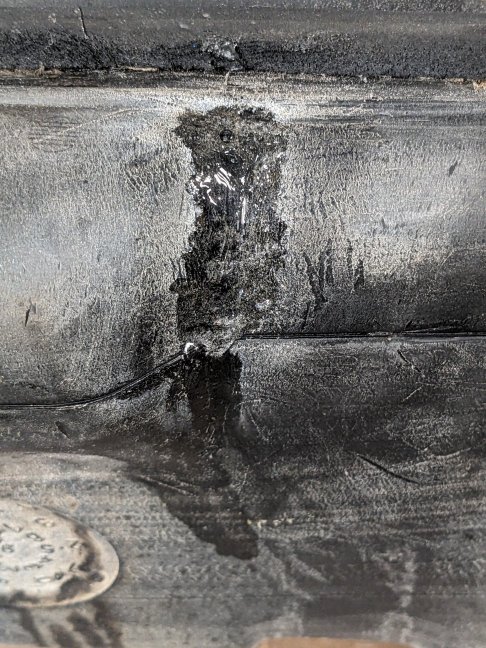
5. I had to modify the recommended process for applying the patch given the compound curves involved in this section of the fuel tank. The patch is 1/16th inch thick, and even though it's rubber it will not conform to the curves without creating gaps. Ideally, you would put one large patch over the crack and be done.
In this case, I ended up cutting three 1/2 inch strips. Following the application instructions, the center strip went on first, directly over the crack. I then used the adhesive bottle to run a bead around the edges of the installed patch and applied the activator. I then followed that up by installing two patches on either side, leaving a slight gap and again, filling around the edges and gap with adhesive...then activator. (no image of left-most patch)

Having plenty of the patch material, I decided to apply a fourth patch to the right thus leveling out the area where the tank strap sits. (no image)
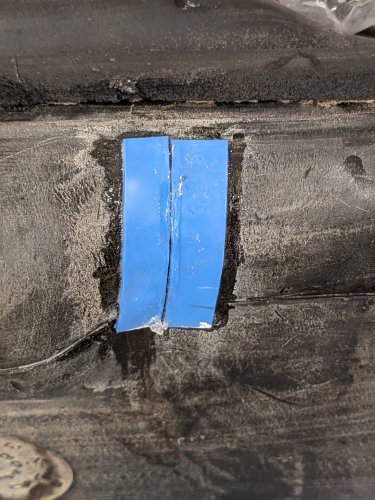
The patch material raised the area enough that I felt a single patch could now be applied over the top. I confirmed this with TB Bonding tech support as a viable option. I had to work it bit but was successful in applying the larger patch over the top.
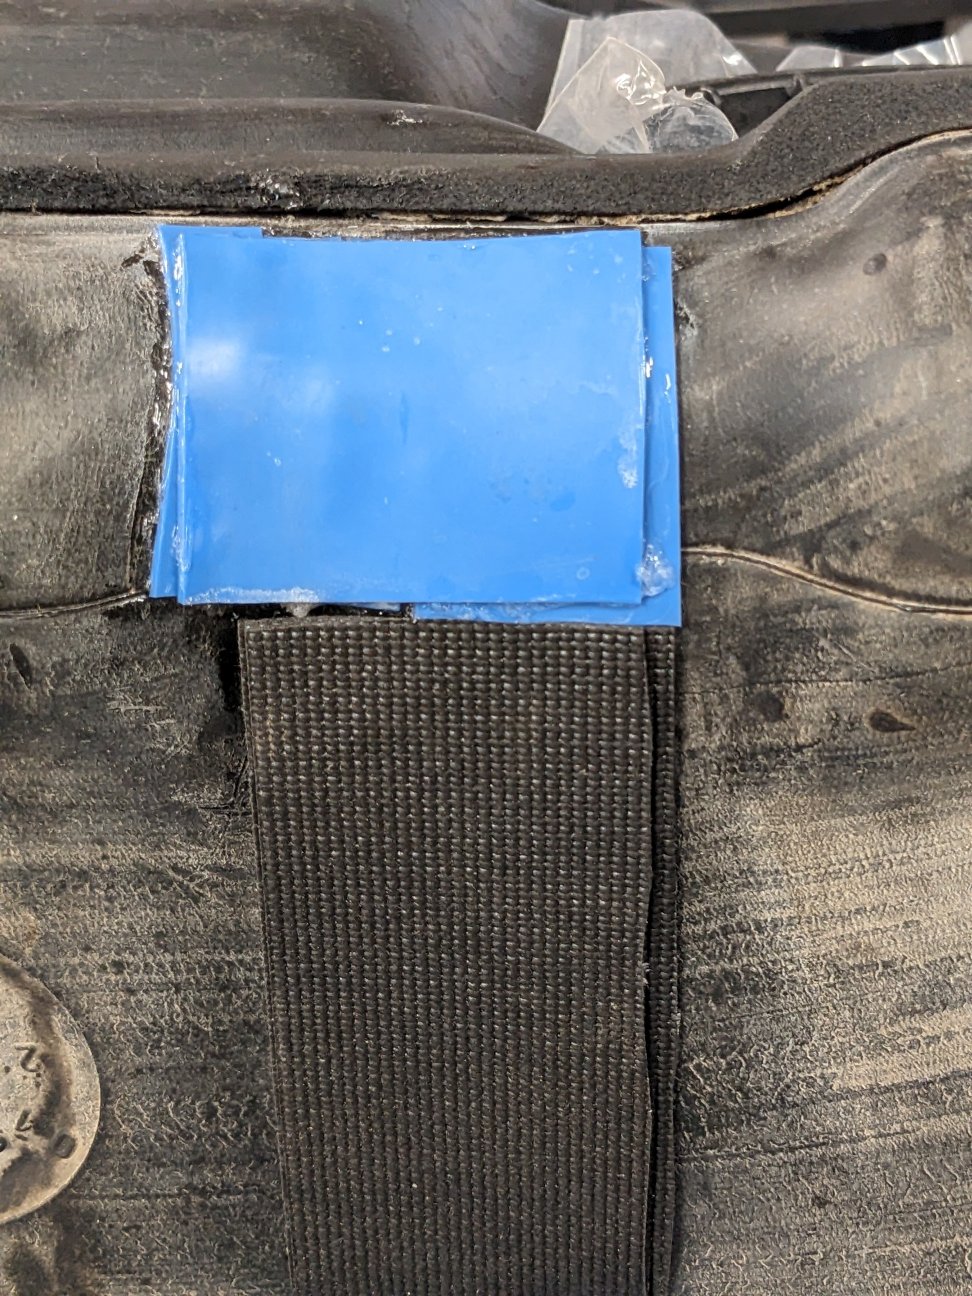
6. I then added a couple of strips of "tool drawer liner" that I had laying around, directly below the patch, to make a better transition for the tank straps.
All in all it went pretty well but needed to be a little creative because of the compound curves. The company was very helpful and responsive to any problems.
Hope this helps someone...
->Posting last edited on Fri, 18 Aug 2023 18:08:29.
_______________________________________
-------------------------------
900 Turbo Convertible - 1991, Automatic
Enhancements: Swedish Dynamics Stage 4 Red Series APC, Fuel injector set, and EPROM(Fuel "Chip") for the BOSCH 2.4 LH fuel management system!
-------------------------------
Colorado Springs, CO
Posts in this Thread:
Members do not see ads below this line. - Help Keep This Site Online - Signup
Post a Followup
No Site Registration is Required to Post - Site Membership is optional (Member Features List), but helps to keep the site online
for all Saabers. If the site helps you, please consider helping the site by becoming a member.
StateOfNine.com
 |
SaabClub.com
 |
Jak Stoll Performance
 |
M Car Covers
 |
Ad Available
 |

Random Saabnet.com Member Gallery Photos (Click Image)

This is a moderated bulletin board - Posting is a privilege, not a right.
Unsolicited commercial postings are not allowed (no spam). Please, no For Sale or Wanted postings, SERIOUSLY.
Classifieds are to be listed in The Saab Network Classifieds pages.
This is a problem solving forum for over 250,000 Saab owners, so expect to see
problems discussed here even though our cars are generally very reliable. This is not an anything goes
type of forum. Saabnet.com has been a moderated forum since 1988. For usage guidelines, see the
Saabnet.com Mission and Purpose Page. Please remember that you are
not anonymous. Site Contact | Site Donations | Other Sites by SP -
Poverty2Prosperity.org | Run Club Menlo Park | ScreenBot
Site Members do not see red text instructions, bottom of the page anchor ads, or box ads.
Click here to see all
the Site Membership Benefits!


 1 Saabers Like This Post!
 (#2198) [Profile/Gallery]
(more from Matt Grimes) on Fri, 18 Aug 2023 17:49:08
(#2198) [Profile/Gallery]
(more from Matt Grimes) on Fri, 18 Aug 2023 17:49:08

 [Profile/Gallery]
, Fri, 18 Aug 2023 14:36:30
Members do not see ads below this line. - Help Keep This Site Online - Signup
[Profile/Gallery]
, Fri, 18 Aug 2023 14:36:30
Members do not see ads below this line. - Help Keep This Site Online - Signup
 1
1 , Fri, 18 Aug 2023 15:15:17
 , Sat, 19 Aug 2023 13:49:30