1994-2002 [Subscribe to Daily Digest] |
 Members do not see ads below this line. - Help Keep This Site Online - Signup
second post in one day... the devil makes work for idle hands
drs_install <-- search key
So after preaching that cooling system work does not require yanking the lower hose and spilling all of the coolant, I decided to do what I have told folks to do, myself. AS I have done years ago with lesser vehicles.
As I did the water pump adapter work last fall and flush etc, I did not want to loose the fluid. Hey, it cost 8 whole dollars! But this stuff is posion and it is good to not have this running down the driveway.
So, I put a 1/4" OD nylon tube thru the reservoir and down its lower hose conection to where the hose joints the hard pipe to the water pump. I syphoned that and got around 3 quarts which took me well below the upper rad hose. The remove the rad hose at the rad and ran the tube down the rad side tank and started that. While that was running I jacked up the front left conner white high to allow the fold in the rad to drain towards the syphon, and switched to the second 1 gallon jug. I gat around 3 quarts in the second jug. Then with a 60cc syringe from Tractor Supply Co (TSC) I got the plud from the crook of the hose near the thrermostat. Then removed the higher of the two heater hoses and ran the nylon tube down the hose to the heater core. blah blsh blah, you get the picture. I think that I lost 5 or 6 ounces of coolant and the reservoir was a bit over filled, so I will see in the AM when things are cool if I need to mix any make up.
So even if you are replacing the coolant, you don;t need to spill it and create your own hazardous waste site.
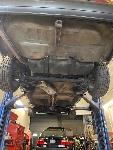
So to the work. The heater hoses are a pain. You have to get under the vehicle and they are below the steering rack and above the cat converter. They are relatively high, so after you loosen the 7mm drive hose clamps, it is difficult to remove them and there is no way to pry against something against the hose ends. But is is not impossible, just awkward and a pain in the neck.. or POA as others have said.
The AC evap conensate drain is right there dead center and in the way. Just yank it off and check to see if it needs to be cleaned out. Don't forget to put it back.
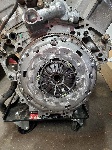
The stat is tricky. Remove the upper rad hose and then remove 2 #30 torx screws from the hard pipe suppor tha bolts onto the stat cover. The rear one is difficult as it is obscured by the hose going to heat the throttle body.. yes you heard right. You dont have to remove the hose, but you will find that screw challenging.
And as you remove the cover, you will have to bend the flange over to get the cover out. You thus might be able to leave the cover bolted to it, but then you would not be able to clean and inspect etc. I put a thin film of sillycone grease (apologies to Dow Corning, whatever court room or bankrupsy (interesting spelling!) court they are in these days) on the cover and rubber seal etc.
Then remove the two 14mm bolts on the stat cover. When replacing the stat, it will come with a new rubber seal, make sure that the air vent with the little brass piece is oriented up top.
I put never sieze on the 4 fasteners when replacing. Don't oever tighen things, you are not clampimg a gasket.
I replaced the hose clamps with all stainless gear clamps, and the lower heater hoses at the firewall were double clamped with narrow clamps where the tighening gear part is small and will conform better to the smaller ODs. The factory clamps are very poor in this regard and are a source of seepage and leaks. Not hard to guess why new production has spring clamps!
The lower rad hose was straight forward. I lost around 2 ounce of fluid when removing the lower hose at the rad, but I did run a hose down there to remove what I could after the top end was free.
Note that when I did the lower rad hose, I still had that corner jacked up high.
There was around 2 to 3 ounces of fluid lost when the hoses were removed at the firewall. I blwe in the one hose ealier to collect more fluid in the other to syphon it out. Watch you technique and remember that the coolant can destroy your kidneys, and those of children or pets that are attracted to its sweet smell and taste.
I also cleaed the reservoir, as it was full of deposits from the previous fluid green fluid and had ... drum roll ... green deposits. It was difficult to see the fluid levels in the tanks. I spend quite a while cleaning it as best I good. I had a few steel nuts in there and yet another stack of neo magnets and scrubbed much of it away. It is not completely clean, but is does allow for the level of the fluid to be seen cleanly enough. So how do they make coolant that leaves the metals clean and scale free and puts all of that crap in the poly bottle that you have to see through!
And yes... the degree of difficulty! FOUR BEERS...hey it was a long day :) Note really that difficult, I just take my time and do things the way that I want them done. Others could get the job done much faster. So the beer factor has to take a long warm afternoon into account. So now I am staged to install that nice group purchase Viggen IC. Then the wife will come out and see that the front end of the Saab is torn away, the she will be convinced that everything that she has long feared about me is really true.
And to all a good nite!
posted by 65.68.100...
No Site Registration is Required to Post - Site Membership is optional (Member Features List), but helps to keep the site online
for all Saabers. If the site helps you, please consider helping the site by becoming a member.
 |
 |
 |
 |
 |