1985-1998 [Subscribe to Daily Digest] |

We have a '92 9000s, great vehicle, good condition, one of the best handling cars I've ever driven.
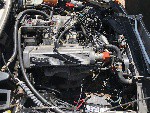
We had a slight leak in the head gasket detectable by bubbles in the coolant recovery tank (and the need for coolant). One weekend to change the head gasket. Shortly after that I started reading about timing-chain failures on these engines and the catastrophic damage it can cause, so, the next weekend was the timing chain.
Having just had the head off the engine I certainly didn't want to take it off again, nor was I that enthusiastic about removing the front cover and associated accessories on the front of the engine; lastly, my idea of fun is not working through the wheelwell. So, having read about rolling in the chain, and checking with the local dealer about a kit that is made for the job, rolling-in seemed the thing to do.
Overall the job was pretty much as could be expected. Removing the old link was simple, just grind-off the raised part of any of the through rivets on one link of the chain; no specific link, just pick one, the most convenient being the preferable. I should add one thing I did do... I was very concerned about dropping one end of the chain down into the timing cover after I had separated the link, to prevent this I took a few tie-wraps and tie-wrapped around the chain and through each of the cam sprockets. This held the chain over a sufficient portion of each cam sprocket to keep it quite reliably in place, and thereby not dropping down into that timing cover. I should add that at some point along the way the chain tensioner, which can be removed from the exterior of the engine must be removed to relieve tension, but more importantly, to give slack to work with that old and new chain.
Once a couple of tie-wraps were holding the chain at each cam sprocket, I chose a link between the two spockets and ground-off the tops of two rivets on one link (rag under links to prevent filings heading down into engine). With a little gentle persuasion the link pops off (plenty of stuff stuffed down into any opening that could result in any part of that link falling down into the engine), and then the remaining portion of the link will slide out. You now have one chain with two ends. The kit from the dealer contains a temporary link (emphasis on temporary) which allows you to connect the end of the new chain to an end of the old chain (what I actually did, still worrying about dropping the end of the old chain, was to connect both ends of the new chain to each end of the old chain).
You now have one very long timing chain. If you used the tie-wraps, take them off. Now, with the help of a partner you can turn the crank slowly and carefully to feed the chain in. It is very important to move very slowly and deliberately, since, and this is very important, you must also be turning the cam sprockets in concert with the crank---remember, from what I've read, the pistons can strike the valves, so turning just the crank alone will result in locking-up against the valves, or valve damage. Slowly, just a few degrees at a time, gently work that chain in there.
If all has gone well, the new chain will appear. Rotate the chain to the position of the original paying particular attention to the camshaft timing marks and the timing mark on the flywheel (though you must spend more time on the timing thing).
To rejoin the chain...
Remove the temporary (again, emphasis on temporary) link or links and install the permanent link. Saab, evidently has a special tool to flatten or spread the head of the new link rivet. I didn't have that tool. To accomplish the task I used a ball-pean hammer and, just like bucking a rivet, used the ball-pean to shape the head of the rivet. Since it would be a very bad idea to hammer on the chain between the sprockets (I think you would break or fracture a cam sprocket) I removed the front sprocket not only to prevent damage to the sprockets, but also to have room to place a heavy chunk of metal behind the link being bucked (you usually need a good solid object behind anything that you are riveting in this manner), and, lastly, for ease of work. I'm comfortable with this method of riveting, many people wouldn't be, for them, I'd suggest the use of the special tool to close the link.
Lastly, when you are very comfortable with the quality of the job closing the link--please remember, if this link opens up, that's just the same as a broken timing chain, the whole reason you started this job--position the chain and reinstall the sprocket, and, check those cam marks and crank marks for timimg (you will have some play in the chain which must be compensated for during installation--turning the crank and cam sprockets in the correct direction of engine rotation to feed the chain in and through will definately help, but, during this job the hydraulic device that maintains chain tension, which you removed earlier, must be re-installed, which will mean more adjusting (for me that was loosening the cam sprockets to the point that they were off the camshaft key and then moving whatever was necessary to get the timing back to where it should be).
Down side of all this? The chain tensioner block which evidently is a rubbing surface wasn't changed, nor to my knowledge, could it have been changed using this approach.
If there is a next time, and next time I would do the head gasket and the chain at the same time, I'd lift the engine out, put it on a stand, and work on it from there.
It was through this excellent site that I found some of the information to help with the job. Before you do anything, make certain you have all the info. you need to do the job right.
Best of luck
posted by 204.108...
No Site Registration is Required to Post - Site Membership is optional (Member Features List), but helps to keep the site online
for all Saabers. If the site helps you, please consider helping the site by becoming a member.
 |
 |
 |
 |
 |