1985-1998 [Subscribe to Daily Digest] |

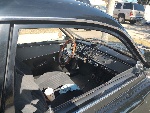
The '88 is basically the same car as yours. The lower engine mounts are located directly below the water pump, at the front of the engine, and below the oil filter on the back of the 2.0L engine.
It's definitely at DIY job, but it's messy. Removing the wheel arch liner is necessary, as is having some long socket extensions to reach down from above. I thought the Haynes manual was deficient in this area and instead looked at Quasi's website, which unfortunately is down. I bought my lower mounts from Eeuroparts.com, actually off of ebay. Something like $34.00 each. Upper poly mount from Sobstory, upper mount removal tool from Sobstory, and upper rubber mount also from Sobstory.
I didn't replace the transmission mount, although it needs it. My shifting was substantially improved by replacing the front and back lower mounts and both upper mounts on the "dogbone."
Procedure: Remove wheel arch liner, just the front part. Remove the dogbone. This will leave one upper mount attached to the back of the cylinder head and one on the dogbone. If you get poly, put that into the mount on the back of the cylinder head and use rubber on the dogbone. You can buy a new dogbone with the mount installed or DIY.
Place some wide blocks of wood, like 2x8, under the oil pan and bring the jack up to just touch the wood. Don't lift yet. Remove the nuts from each of the front and back lower mounts. One nut each. Slowly raise the engine, wiggling it enough to get the lower motor mounts to clear.
Each lower mount is fixed to the subframe with three bolts. The back one will be a terrific mess. Save the metal parts off your old lower mounts to attach to your new ones.
Pop the new mounts into the subframe and lower the engine down onto them. This will take some adjusting. Tighten nuts to, IIRC, 22 ft-lbs. It was less than I expected.
For the top mount, the dogbone just requires pressing out the old mount with the Sobstory tool and pressing in a new one. Getting the new one started straight requires the services of a rubber mallet and block of wood. The mount which attaches to the cylinder head will have to be taken off the engine to adequately get access, but you could try the Sobstory tool on it first. If removing it, you have to loosen the two Allen bolts for the alternator, pulling it backwards, to give you access to the four bolts holding on this motor mount. The O2 sensor wire may run through it, so you may be forced to either remove the O2 sensor (too much trouble) or work on the mount up on top of the engine. New poly mount is two-piece and definitely easy to put in. Recommend this over replacing the front part of the top mount with one you have to press in.
Hope this helps.
posted by 205.213.12...
No Site Registration is Required to Post - Site Membership is optional (Member Features List), but helps to keep the site online
for all Saabers. If the site helps you, please consider helping the site by becoming a member.
 |
 |
 |
 |
 |