1999-2009 [Subscribe to Daily Digest] |
 1 Saabers Like This Post!

I did the job in a little over four hours. I had the use of a lift, which undoubtedly made it easier. Here are the instructions.....
Disconnect the battery negative terminal
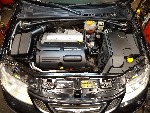
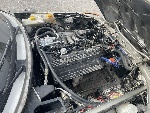
Remove engine upper cover
Remove exhaust manifold heat shield ((13 mm)
Remove the dipstick and oil filler pipe (10 mm) The lower end just slides into a hole in the block and seals with an O-ring so just wiggle it up after removing the bolts.
Undo two of the nuts on the exhaust pipe flange (13 mm). The third gets removed from below. Use PB Blaster or other penetrating oil if needed.
Disconnect the three hoses that connect to the oil trap from their upper ends.
Raise the car so you can work underneath.
Undo the third nut on the exhaust pipe flange.
Undo the bolts securing the bracket between the front exhaust pipe and the engine block (13 mm) and remove the bracket.
Undo the nuts securing the exhaust pipe to the catalytic converter (or the intermediate pipe whichever is easier) (13 mm)
Remove the two clips securing the rubber exhaust pipe hangers and free the exhaust pipe from the hangar. Free the upper end of the exhaust pipe from the flange and push the exhaust pipe to the driver’s side of the car. It doesn’t need to move very far. Be careful not to bend the flex segments of the exhaust pipe.
Remove the stay between the intake manifold and the engine block (13 mm)
Disconnect the electrical connection from the starter and from the alternator (12 mm). On my car the nut securing the wire to the alternator was secured with some type of resin. I used a soldering iron to melt the resin so a wrench could get on the nut. Pull the wire free from the studs and move it out of the way.
Disconnect the wire from the bottom of the alternator (8mm) and move it out of the way.
Undo the two bolts securing the oil trap from the engine block (13mm w/ extension)
Remove the L-shaped hose that goes from the bottom of the trap to the oil sump.
After I completed the job, I realized that I should have made U-shaped clips (a bent nail with the head removed) to hold in the tabs on the hose connectors to simplify removing/installing them. I tried it on the bench and it worked there, but haven’t tried it in the car.
Now the “fun” part, which is disconnecting the three hoses from the oil trap. You need to press in the tabs on each side of the connector while pulling it off. You can try this before removing the bolts holding the oil trap to block or after. As SWEDECAR said, you could go bald before you figure out how to squeeze the tab while pulling the pipe at the same time. Somehow I managed to do it. For the left-hand connection I maneuvered the box around so I could access the fitting from above and somehow got it off. If you can get the U-shaped bent nail suggested above on the fitting, it should greatly simplify this part of the job.
With the hoses off, wiggle the oil trap around and take it out the bottom. Have faith, it will come out.
Practice putting the hoses onto the oil trap on the work bench so you see how they work. You’ll discover that you can just press the fittings onto the nipple without needing to press in the tabs, but they need to be aligned correctly. Try with the bent nail clips to see how that works.
Wiggle the new oil trap back up into place. If you hold your tongue just right, it will wiggle right into place, otherwise, feel free to use colorful language to help things along. Install the bolts that hold it in place now or later
Cut a U in the end of a long stick (½" x 2" x 3 or 4 feet) that fits the smaller diameter of fitting. You’ll use this to lever the fittings onto their nipples. One of the fittings is larger than the others, so do it last and re-cut the U to fit.
Connecting the hoses to the oil trap is the second “fun” part. Apply some grease to the nipples and connectors. Try using the bent nail to hold in the tabs provided you can get them off later. Maneuver the new hoses into position. Slide a fitting over its nipple and then used the long stick with a U cut into one end to lever the fitting onto the nipple using the frame as a fulcrum. It took some wiggling and a fair amount of force to get them to go on.
From here, just put everything back together.
Total time to do the job for me was a bit over 4 hours and I disconnected/connected the fittings the hard way (without using a bent nail to hold in the tabs). I had the use of a lift which undoubtedly made things easier.
Hope this helps the next person that has to do this job.
posted by 75.166.87...
 1
1 , Sun, 8 Jul 2018 18:55:56
 , Sat, 7 Jul 2018 12:42:21, Fri, 6 Jul 2018 18:21:00
 , Sat, 7 Jul 2018 12:03:42, Sat, 7 Jul 2018 11:23:46
No Site Registration is Required to Post - Site Membership is optional (Member Features List), but helps to keep the site online
for all Saabers. If the site helps you, please consider helping the site by becoming a member.
 |
 |
 |
 |
 |