1985-1998 [Subscribe to Daily Digest] |

You can review the below and see if you want to tackle. The pictures can be viewed if you go to the link referenced at end. May want to check for yourself first how much play the center shaft has on the turbo....although minimal play may not necessarily mean an oil seal is not bad?
From reading this site over the years I have to say that the 93 model 9000 has a fearsome reputation for throwing good money into a deep pit. I would recommend a 93 to a DIY'er only who has alternate transportation available.
DanaH
97 9000CS, 140k miles, orig turbo
Odd stuff to have on hand:
* A new gasket for the joint between the turbo and the oil return line. It's a simple flat gasket, sort of diamond shaped.
* An extra E-clip or two for the wastegate rod (hardware store).
* Tags for marking vacuum hoses
* Cable ties to secure banjo fitting gaskets and couplers
Recommended tools
* 13 mm 6-point box end wrench and socket (helpful on the water inlet fitting, to prevent rounding off the bolt head)
* 3/8" drive u-joint, 10" and 3" extensions
* Hammer and a 12" chisel, in case that rear water banjo fitting gets rounded off
Required tools
* 13, 15, 17 and 19 mm combination wrenches
* 3/8" drive ratchet, 13 and 19 mm sockets
* Screwdriver or nut driver for cable clamps
* Something to cut existing cable ties with (I prefer dikes)
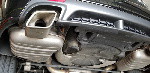
Overview pictures of the turbo
You'll need to work from above and below the car, so pull the car up onto ramps.
* Remember, you'll be working on exhaust components, so don't dawdle around getting it onto the ramps, and give it some time to cool.
Drain the radiator, as coolant hoses will need to be disconnected.
* Remove the passenger-side cover panel underneath the front of the car, then remove the radiator drain plug - it's on the extreme end of the bottom of the radiator (U.S. passenger side).
* Reinstall the plug after the coolant stops draining.
o When reinstalling the plug, tighten it gently, as it's plastic and is designed to shear off with the slightest over tightening.
Label all the lines for the turbo boost control as you remove them from the turbo
* One goes to the wastegate
* One goes to the end of the turbo on top (reference)
* One goes to the turbo underneath (pressure, or "charge").
* A vacuum hose goes to the turbo bypass valve
The following sections on crankcase vent pipe and intake duct removal apply to 91 (and probably any up through 93). 94 and onward (any without an Air Mass Meter) are much easier to work on and it should be easy to determine what to remove and how to remove it.
Remove the crankcase breather hose assembly.
* Disconnect the breather hose from the grommet in the cam cover and remove the vacuum hose there
* Disconnect the upper preheat water hose (Picture)
* Disconnect the lower preheat water hose (Picture)
Loosen the clamp on the bypass hose where it attaches to the metal intake pipe, then loosen the bypass hose and remove it from the pipe. (Picture)
Pre-93 or 94 models - Remove the intake duct between the Air Mass Meter (AMM) and the turbo intake - loosen the clamps until you can slide them back on the duct, then work the duct back and forth to break it loose. Be very careful of the AMM outlet; the duct is not very flexible and you need to work carefully to avoid damaging the AMM screen. You might have more success by releasing the clips at the air cleaner, disconnecting the AMM electrical plug, and removing the AMM and the duct as an assembly. Once disconnected, the entire intake duct, bypass valve and hose, and vent hose assembly can be rotated upward and to the side to get it out of the way.
Later models: Remove the intake duct (no AMM to deal with).
If you want, you can remove the radiator fan and rotate it out of the way - two screws at the top, one at the bottom toward the center of the car.
Remove the exhaust downpipe - three 13 mm nuts on the exhaust end of the turbo. (Picture. Bigger picture) You can get the bottom and top front ones with a 13 mm box end wrench. For the top rear one, I used a 3/8" drive 10" extension, a u-joint, a 3" extension and a 13 mm socket. Feed the extension up through the opening behind the AC compressor. Attach the ratchet just above the serpentine belt. Put the socket on the nut and loosen it. Be careful of the oxygen sensor wires - make sure they have enough slack when you push the pipe off. After the nuts are loose, use a screwdriver to lever the pipe off the studs. (Return to clutch/5-speed page, for those who snuck in from there).
Working from underneath, remove the two 13 mm bolts that secure the oil return pipe to the turbo; it helps to move the exhaust downpipe out of the way a bit. Being careful not to damage the gasket, rotate the pipe down and away from the turbo. Odds are that you'll damage the gasket anyway, so it's good to have a new one on hand.
Working from underneath, remove the bolts from the turbo brace - one at the engine block, one at the turbo (13 mm, I think).
Working from the top again: The water pipe ends are called banjo fittings; they're secured with a threaded pipe with holes to allow fluid flow. There is a copper washer on each side of the "banjo" for sealing - be sure to retrieve both copper washers after removing the threaded fitting, and use a cable tie or something to secure the threaded fitting and the two sealing washers to the pipe. (Picture of the oil and water fittings) Remove the 15 mm oil inlet nut from the front of the turbo (this is a flared pipe fitting). Remove the 19 mm water outlet fitting from the lower side of the turbo. There is a 13 mm water inlet fitting on the top rear - it's not easy to get to, and it's very easy to round it off, so be careful. Be sure to apply even, non-twisting torque to it (a ratchet and socket tend to apply twisting torque, so use a box end if possible, and a 6-point tool rather than a 12 point if at all possible). I don't remember the best tool to use. You can leave it until the turbo is disconnected, or you can even remove the turbo with the water inlet pipe attached if you disconnect the other end, although it will be trickier to get it out. It's a good idea to at least loosen the connections to the block for the two water pipes, to make it easier to work and easier to align the fittings when reinstalling.
Remove the clamp from the turbo output rubber duct and remove the duct from the turbo. (Picture)
Remove the four 13 mm nuts that secure the turbo to the exhaust manifold. A box end will fit on all but the left front one - that one needs an open end wrench. You can reach around the back of the exhaust manifold to help guide the wrench on the back nuts. When they're loose, drop the turbo down, work it to your right, then pull it up out of the hole you made earlier by removing all that other plumbing. Be careful of the AMM, if it is still in place. Don't lose the metal gasket. (Picture)
Parts swapping
Hopefully, you'll have a complete replacement turbo with all the brackets and studs that you need. I had to remove all the studs and transfer them to the new unit, as well as the center flange pieces that the under-brace bolts to. (Picture) If your replacement turbo doesn't have the bracket, you'll have to remove it from the old turbo and put it on the new one. Be sure to mark the relationship between the exhaust, intake and center section housings before you loosen the four bolts. Make sure the alignment is the same after the transfer before tightening the bolts.
You'll have to swap the wastegate from the old unit to the new one. Be careful not to lose the spring clip that secures the wastegate rod. Bailing wire will do as a short term sub, and new clips can be found at hardware stores. The hole in the rod should just slip over the rod on the wastegate arm. If you have to pull it any significant amount, it's probably too short and you'll need to loosen the jam nut on the rod and screw the rod out some to lengthen it.
To remove studs, run one nut onto the stud, then follow it with a second nut. Using two wrenches, lightly jam the nuts together, then wrench the lower nut to extract the stud. Thread the stud into the new unit and use a wrench on the upper nut to run the stud into place.
Reinstallation
Maneuver the new unit into place. You might want to install the water inlet pipe before installing the turbo itself (if the water inlet pipe is completely removed). Install the metal gasket on the studs, position the turbo on the manifold and loosely install the nits to hold it in position.
Install the water and oil hoses, being sure to install a copper washer on both sides of all banjo fittings. It's very helpful to loosen both ends of the pipes that have banjo fittings, as aligning the pipes and fittings is tricky; be careful to avoid cross-threading. It'a also helpful to have the turbo loosely mounted so you can wiggle it around a bit.
Working from underneath, install the oil return pipe (gasket sealer on the gasket) and the brace.
From on top, install the exhaust downpipe.
Reconnect the turbo output hose coupling and tighten the clamps.
Tighten the turbo-to-exhaust manifold nuts.
Reinstall the intake duct and tighten the clamps on both ends. Be careful of the AMM.
Reconnect the bypass hose to the metal intake pipe and tighten the clamp.
Reconnect the lower preheat water hose to the turbo water inlet pipe and tighten the clamp.
Reconnect the reference hose.
Reinstall the crankcase vent hose in the cam cover and reconnect the vacuum hose there.
Reconnect the upper preheat water hose to the throttle body and tighten the clamp.
From underneath, install the bypass valve actuator vacuum hose. Install the pressure hose. Install the wastegate hose. The latter two should have clamps.
Fill the system with new coolant.
Pre-start checklist
Water inlet pipe tight at rear of turbo at engine block
Water outlet pipe tight at rear of turbo at engine block
Oil inlet pipe tight
Oil return pipe tight, rubber coupler OK
Brace installed underneath turbo
Exhaust downpipe nuts (3) tight
Exhaust manifold nuts (4) tight
Oxygen sensor and wiring secure (make sure wiring is clear of the serpentine belt)
Turbo output coupler tight
Inlet duct tight at AMM and turbo
AMM to air cleaner clips secured
Bypass hose clamp tight at metal intake pipe
Electrical connections
AMM
DI - DISCONNECT BEFORE STARTING (to build oil pressure)
Temp sensor on inlet pipe
Throttle position sensor
Crankcase vent and vacuum hose connected to cam cover
Two small water connections secure - at throttle body and turbo water inlet pipe pipe
Crankcase vent connected at (lower end)
Radiator refilled with coolant
Start-up
Make sure the DI is disconnected, then crank the engine for five to ten seconds to build oil pressure.
Reconnect the DI and start the car. Immediately look underneath for oil or water leaks, then check from the top.
Idle the engine for five minutes or so to make sure no problems develop. If all is well, drive the car. The base boost may need to be readjusted.
posted by 170.63.96...
http://www.jope.fi/saab/www.quasimotors.com/turbo_r&R.htm
 , Mon, 2 Jan 2012 18:38:23
 , Wed, 28 Dec 2011 10:08:57
No Site Registration is Required to Post - Site Membership is optional (Member Features List), but helps to keep the site online
for all Saabers. If the site helps you, please consider helping the site by becoming a member.
 |
 |
 |
 |
 |